NLS Operations Suite - User Manual Version 20
1. About this manual
This manual explains, in plain language, how to use the New Line Systems (NLS) Operations Suite, version 21. It covers every module of the application: Dashboard, Clients, Leads and Quotations, Projects and invoicing, Inventory, Purchase, Schedule, AMC Management (contracts, Excel import, the PPM Schedule List), Complaints, Calendar, Team Management, Reports and Settings.
It is written for everyone who uses the system: the Admin, managers, sales, accounts, store keepers, project engineers and the technicians and team leaders who complete visits in the field. Each chapter says who can do what. If you are in a hurry, go to chapter 3 (Quick start by role) and then to the chapter for your daily work.
What is new in version 21
| New in v21 | Where to read |
|---|---|
| Team Management: standalone Team members section and + New member removed; enter members only in Add team / Edit team | Chapter 16 |
What is new in version 19
| New in v19 | Where to read |
|---|---|
| AMC Contracts list: first-page columns are Action | Contract No. | Building | Client | Start | End | Last PPM | Next PPM | PPM Frequency | Status. Location shows muted under Building. Other fields (name, systems, remarks, value, type) are on the Action menu or Edit form | Chapter 11 |
| Top-right Filter: choose a field (AMC Contract No., Client Name, Building Name, Location, PPM Frequency, Status, Systems, and more), type a value and press Apply (or Enter). Clear removes the filter. Exports still use the full Excel columns and respect the filter | Chapter 11.5 |
| Action column: a ☰ button opens a menu to the right — Client details, Task, PPM details, Payment details, Checklist, PPM dates, Edit, Contract PDF, Renew, Delete request (Admin also sees Remove PDF when a PDF is attached) | Chapter 11 |
| Manage Projects list: same pattern — Action ☰ (PO & Terms, Site visit, + Activity, Invoice request, Payment details, Edit, Cancel, Delete), top-right Filter, tighter rows. Columns: Action | Job # | Project/Client | Team | Start→End | Status | Progress | Contract value (excl. VAT) | Received (excl. VAT) | Balance (excl. VAT) | % received (from excl. VAT amounts) | Chapter 9 |
What is new in version 18
| New in v18 | Where to read |
|---|---|
| The top bar and the Calendar "Calendars" label for the signed-in user show the company name (default New Line Systems LLC) instead of the person's display name. Admin / division / Synced badges and the division switcher are unchanged. The Admin edits the name in Settings > Company name | Chapters 15 and 17.1 |
| Calendar Team and Date filters at the top: Team (All teams + each team) and Date (All dates / Today / This week / This month / Pick a date / Custom range). Both are remembered per division | Chapter 15 |
| The Schedule page has Schedule | Calendar tabs at the top so the Calendar (with the Team filter) opens without leaving Schedule | Chapter 15 |
What is new in version 17
| New in v17 | Where to read |
|---|---|
| Create Team form has only four fields: Team Name, Team Leader, Team Members (left blank: names are entered when a PPM or task is given) and Team Type (AMC Team / Projects Team / AMC & Projects) | Chapter 16.1 |
| AMC contract with start and end date: the PPM visit dates are created automatically from the PPM Frequency (monthly, bi-monthly, quarterly, half-yearly, yearly, weekly) and appear on the Calendar. A date on a Saturday, Sunday or UAE public holiday moves to the NEXT working day; only if that falls outside the PPM period it moves to the PREVIOUS working day; it never leaves the period | Chapters 11.14 and 15 |
| UAE public holidays are kept in Settings, pre-filled for 2026-2027 and editable by the Admin (verify the Islamic dates every year) | Chapter 17.5 |
| PPM checklist has a new IP Address column after Item name: read from the uploaded Excel, typed at the contract and at the visit, and included in the printout / PDF, Excel export, template and backup | Chapters 11.13, 12.8 and 18 |
| PPM visit workflow: press Visited first (date, time and who are recorded); Complete stays disabled until then, and completing needs the signed service report (PDF, JPG or PNG). The same rule applies to the Admin | Chapter 12.6 |
| The Calendar shows each PPM visit only on its own date, never across a whole period | Chapter 15 |
| AMC enquiry and quote form: start and end date, PPM frequency drop-down and a contract PDF; the AMC enquiry list shows client and building details and its Action column has only Create quote, which moves the enquiry to the Submit quote stage | Chapter 11.11 |
| The stage "Give quote" is now "Submit quote" (menu, status lists, reports, Help). Old records are converted automatically. In the Submit quote stage the Submit quote button asks you to attach a PDF quote or use the in-app quotation format | Chapters 8.1 and 11.11 |
What is new in version 16
| New in v16 | Where to read |
|---|---|
| Data: Backup, Export & Import (Admin): download a full backup as an Excel workbook (one sheet per collection) and a JSON file, optionally with all uploaded files as a ZIP; restore from the JSON with a preview and merge by number; last-backup date with a reminder after 7 days; Import old data now sits on the same page | Chapter 18 |
| PPM checklist: each AMC contract keeps a checklist with the columns Item, Equipment, Item name and Check item (upload Excel / CSV, add items, template); every PPM visit shows it with a tick, Working / Not working and Remarks for each row | Chapters 11.13 and 12.8 |
| Photos on checklist items (several per item), a Complaint created from any Not working item, customer name and signature drawn on the screen | Chapter 12.8 |
| A red "not working" badge on the PPM Schedule List; the checklist can be printed (PDF) or exported to Excel for each visit; checklists, photos and signatures are part of the backup | Chapters 12.8 and 18 |
| Left menu has more space between the items; text typed in quotation item rows is clearly readable | Chapters 2.3 and 8.2 |
What is new in version 15
| New in v15 | Where to read |
|---|---|
| AMC Contracts follow the latest AMC Excel list: 13 columns plus Remarks, Systems Included (12 systems), filters on every column, exports that follow the filters | Chapter 11 |
| Import AMC contracts from Excel with a preview, warnings and a downloadable template | Chapter 11.8 |
| Automatic AMC contract numbers with an Admin-set prefix and next number for each division | Chapter 11.7, Chapter 17 |
| Remarks column on AMC contracts and on the PPM Schedule List (editable by people who are allowed to) | Chapters 11.4 and 12 |
| Contract PDF copy on each AMC contract (upload, view, replace, remove); the Master user can only view | Chapter 11.6 |
| PPM Schedule List: Today / Week / Month / Quarter / Custom, per-column filters, sort, export, Excel import | Chapter 12 |
| Each team sees only its own PPM visits; Admin sees all and can filter by team; the team leader / technician completes visits and adds remarks | Chapter 12.5, 12.6 |
| Service Report and Delivery Note files (PDF or images, several per visit) on PPM visits and Complaints | Chapter 13 |
| Link a sign-in user to a team member so that team visibility works | Chapter 16.3 |
| Edit and Delete on AMC contracts and Projects; users who are not Admin send a "Request delete" with a reason; the Admin approves or rejects; audit log | Chapter 19 |
| Create schedule button name; bigger, bolder Dashboard range buttons and tabs; team form without the Project / AMC picker | Chapters 7, 14, 16 |
Conventions used
- Buttons and menu names are written in bold, exactly as they appear on the screen, for example Manage AMC Contracts.
- A path such as AMC Management > PPM Schedule List means: open the AMC Management menu, then choose PPM Schedule List.
- Dates are shown as year-month-day (2026-09-28). In Excel files and forms you may type dates as day/month/year (28/09/2026); the system reads them day first.
- Amounts are in AED; VAT is 5% unless the Admin changes it in Settings.
2. Signing in and finding your way around
2.1 Sign in
- Open the NLS Operations Suite address in your browser (Chrome, Edge, Safari or Firefox) on a PC, tablet or phone.
- Type your username and password and press Sign in. Usernames are not case-sensitive.
- If it says "Invalid username or password", check the spelling. A user who is marked Inactive cannot sign in; ask the Admin.
- After signing in, use Change password (top right) to set your own password. Passwords must be at least 6 characters.
2.2 Divisions and the Master user
NLS works in three divisions: NLS - 902, NLS - 903 and NLS - 904. Each division has its own clients, projects, contracts, users and number series. Your division is shown in the top bar next to the company name and your role.
- A division user (Admin, Manager, Sales, Accounts and so on) works only inside their division.
- The Master user has no data of its own. Master sees the combined totals of all divisions on the Dashboard and read-only combined lists with a Division column and a division filter. Master can print and export, but cannot create, edit, delete, upload or complete anything. To enter data, the Master Admin switches into a division using the division switcher in the top bar.
2.3 The screen
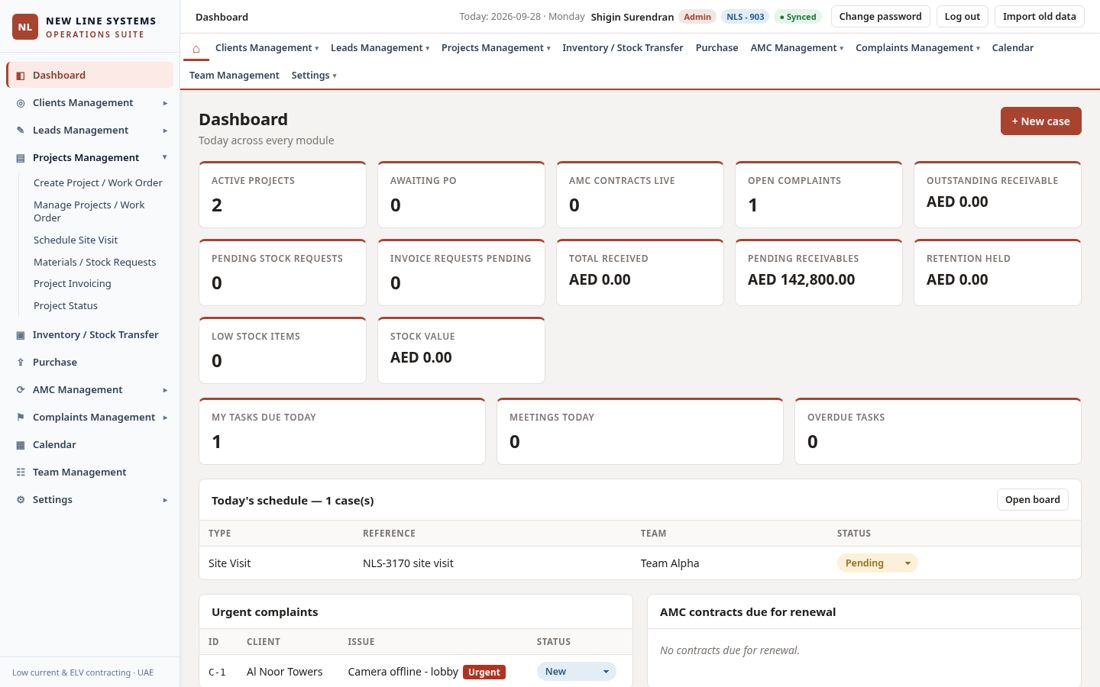
- Left side bar and top menu bar: the same menu in both places. Click a heading to open it; click again or click elsewhere to close it. On a phone, tap the three-line button to open the menu.
- Top bar: today's date, the alert bell (AMC renewals and delete-request answers), your name, role and division, Change password and Log out.
- Page title and path: shows where you are, for example AMC Management > AMC Contracts > Manage AMC Contracts.
- The sync light shows Saving... then Synced. Changes are saved automatically; there is no Save-all button. Wait for Synced before closing the browser.
2.4 What each menu contains
| Menu | What you find |
|---|---|
| Dashboard | Overview, Projects and AMC tabs with date range buttons |
| Clients Management | Create Client, Manage Client |
| Leads Management | Create Enquiry, Manage Enquiries, Quotation / Estimate, Schedule (site surveys) |
| Projects Management | Create Project / Work Order, Manage Projects / Work Order, Materials / Stock Requests, Project Invoicing, Project Status |
| Inventory / Stock Transfer | Items, stock on hand, movements, low stock, project material requests, reports |
| Purchase | Purchase orders and goods received (with Read PO from PDF / scan) |
| Schedule | PPM, Site Visit and Complaint entries (list), with a Calendar tab |
| AMC Management | AMC Enquiry, Submit Quote, AMC Contracts (Create, Manage, Import Excel, Buildings, Assets), PPM Schedule List, Import PPM Excel, AMC Invoice |
| Complaint Rectification | Schedule Visit, Create Quote / Manage, Schedule Rectification Works, Rectification Works Invoice |
| Calendar | Tasks, meetings, calls and all scheduled work |
| Team Management | Teams and team members, linking logins |
| Reports | Nine reports with print / PDF, CSV and Excel |
| Settings | Company Settings (including AMC numbering), Create User, Manage Users, Delete Requests, Data: Backup, Export & Import (Admin) |
2.5 Who can see what
The menu headings you see depend on your role. The Admin sees everything.
| Role | Menus available |
|---|---|
| Admin | All menus, Settings, Users, Delete Requests, Backup / Export / Import, deleting records |
| Manager / Project Manager | Dashboard, Calendar, Schedule, Clients, Leads, Projects, Inventory, Purchase, AMC, Complaint Rectification, Team |
| Sales | Dashboard, Calendar, Clients, Leads, AMC |
| Project Engineer | Dashboard, Calendar, Schedule, Projects, Inventory, Purchase, AMC, Complaint Rectification, Team |
| Technician | Dashboard, Calendar, Schedule, Inventory, AMC (own team's PPM list), Complaint Rectification |
| Accounts | Dashboard, Calendar, Schedule, Clients, Projects, Purchase, AMC, Complaint Rectification |
| Storekeeper | Dashboard, Calendar, Inventory, Purchase |
3. Quick start by role
Admin
- Settings > Create User for every person; set the role and division. Then Team Management: create teams and members, and link each team leader / technician to their login (16.3).
- Settings > Company Settings: company details, VAT, AMC renewal warning days, reminder e-mail recipients and the AMC contract numbering (prefix / next number).
- Every morning: Dashboard, the alert bell and Settings > Delete Requests (the number on the menu shows how many are waiting).
- Every week: Settings > Data: Backup, Export & Import > Download full backup (chapter 18). The menu shows a ! when the last backup is more than 7 days old.
Sales / Manager
- Clients Management > Create Client; Leads Management > Create Enquiry > Create quote (chapter 8).
- Approving a Project quote creates the project automatically (chapter 9).
Accounts
- Projects Management > Project Invoicing: generate invoices from invoice requests, record payments (9.6).
- AMC Management > AMC Invoice for contract invoices.
Team leader / Technician (field)
- Ask the Admin to link your login to your team member record (16.3). Until then you will see no visits.
- Open AMC Management > PPM Schedule List (or the Calendar). You see your team's visits for the month.
- At the visit: if the contract has a checklist, press Complete + remarks (or Checklist): tick each item, choose Working or Not working, add remarks and photos, let the customer sign, then complete (12.8).
- After the visit: enter the completed date and your remarks. A team leader can also attach the Service Report and Delivery Note files (chapter 13).
Storekeeper
- Inventory / Stock Transfer for stock, goods received and issues; Purchase for purchase orders.
4. Working with lists, filters and exports
Most lists work the same way, so learn it once.
- Filters: AMC Contracts uses a top-right field + value + Apply filter (chapter 11.5). PPM Schedule List and Projects still have a filter box under every column heading. Text boxes find records that contain what you type (capitals do not matter). Drop-downs pick one value. Number and date columns have From / To boxes.
- Showing x of y: the line above the table tells you how many records match.
- Clear filters: puts everything back.
- Sort: on the PPM Schedule List click a column heading to sort; click again to reverse.
- Export CSV / Export Excel: downloads the rows you are looking at. When filters are active the file contains only the filtered rows and its name says "filtered". Exports contain all columns, including Remarks.
- Status drop-downs inside a table save the moment you change them.
4.1 Files you can attach
| Where | File types | Size | Notes |
|---|---|---|---|
| Client PO, invoices, quotation acknowledgement, AMC contract copy | PDF only | 25 MB | Stored privately in the database storage |
| Service Report, Delivery Note | PDF, JPG, PNG or WEBP | 25 MB each | Several files at once |
Files open in a new tab through a secure link that expires after a few minutes. If a link has expired, click it again.
5. Dashboard
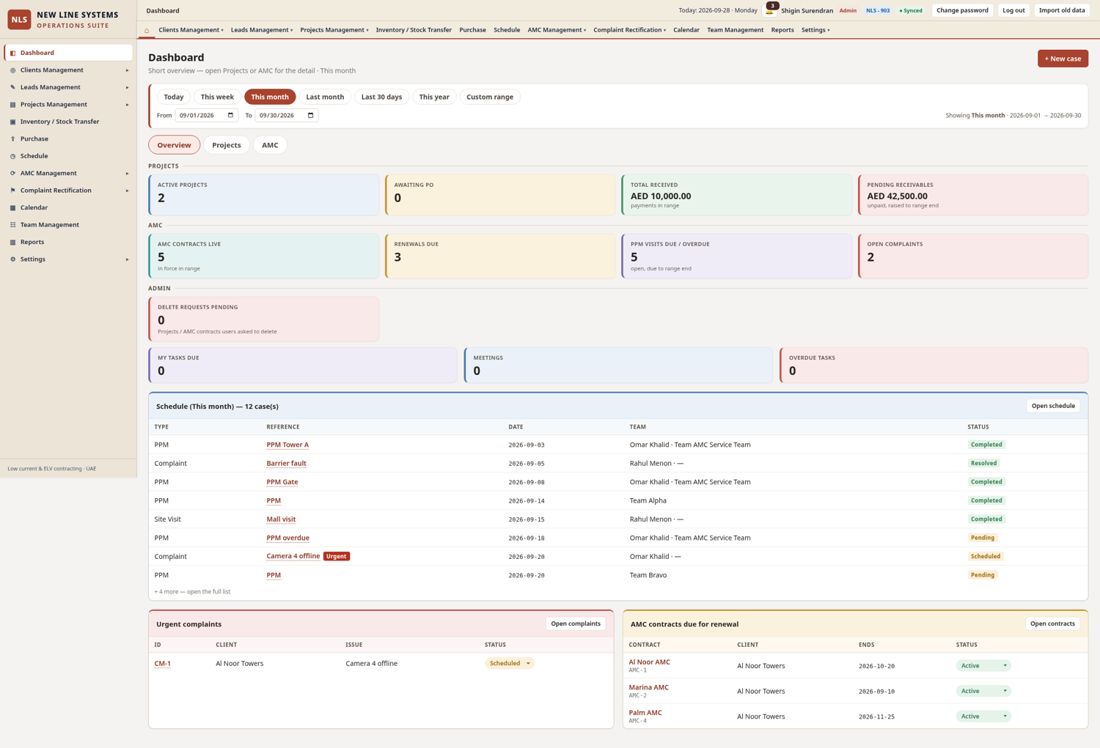
The Dashboard has three tabs: Overview, Projects and AMC. In version 15 the tabs and the range buttons are larger and bold so they are easy to see and tap.
5.1 Choose the period
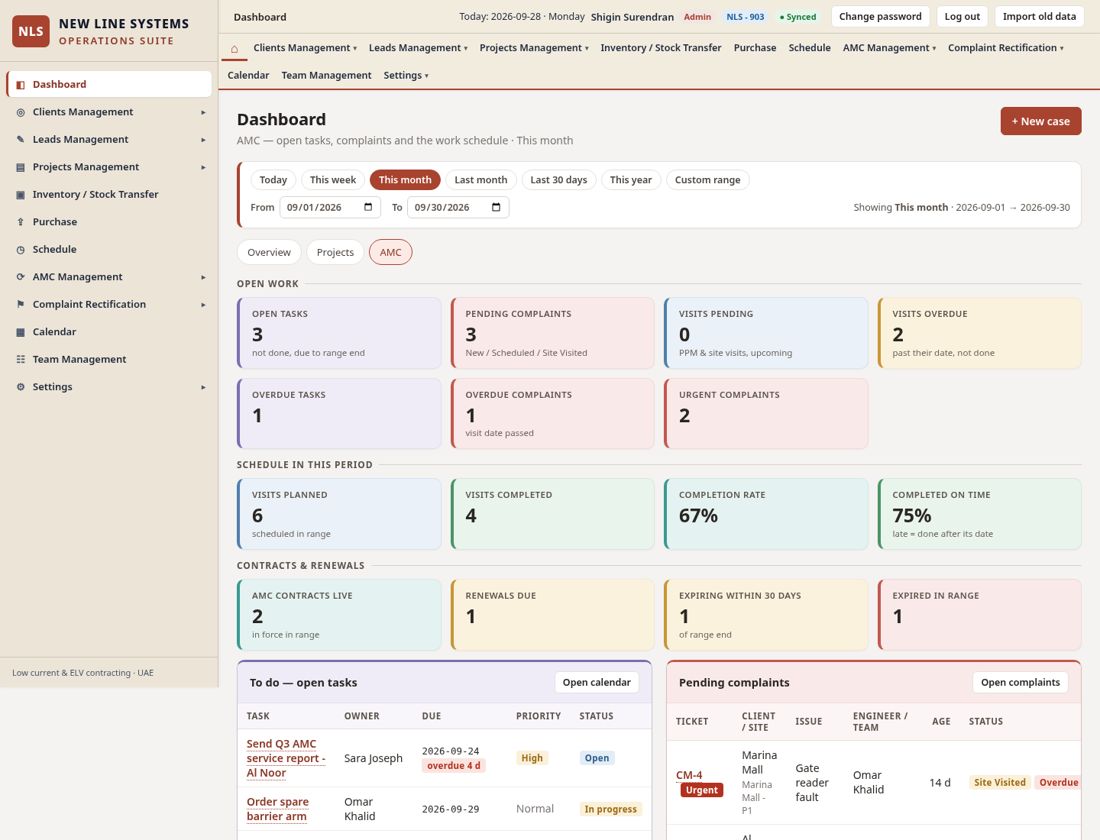
- Click one of the range buttons: Today, This week, This month (default), Last month, Last 30 days, This year or Custom range.
- For Custom range type or pick From and To dates.
- The choice stays when you move between the Overview, Projects and AMC tabs and is kept in the address, so you can bookmark it.
Open items such as unpaid invoices, overdue visits or pending approvals are always shown when they fall due on or before the end of the chosen period, so overdue work never disappears.
5.2 The tabs
| Tab | What it shows |
|---|---|
| Overview | Short summary: enquiries, quotations, projects, invoices, collections, complaints and visits; tiles open the matching list |
| Projects | Progress, milestones, payment collection, material, invoices due, pending approvals, Awaiting PO, invoice requests pending, total received, pending receivables, retention held |
| AMC | Open tasks, pending complaints (with age and priority), AMC schedule pending and finished (on time vs late), visits by engineer / team, per-contract table, charts, renewals and expiring contracts |
Admin also sees a tile Delete requests pending which opens Settings > Delete Requests. The Master user sees combined totals with a breakdown per division.
6. Clients
6.1 Create a client
- Clients Management > Create Client.
- Enter the name and address. Website and fax are optional.
- Add one or more contacts: contact person, designation, mobile, telephone, e-mail. The first contact is the primary one; use Make primary to move another to the top and + Add contact for more rows.
- Save. A warning appears if the client has neither a mobile number nor an e-mail.
- Phone numbers accept UAE formats (+971 50 123 4567, 04 123 4567, 050-1234567, 600 / 800 numbers) and other countries with a + code.
- Quotes, AMC contracts and invoices print the client address and an Attn block from the primary contact.
- Manage Client lists the clients with the number of enquiries, projects and AMC contracts, and an Edit button.
7. Schedule (PPM, Site Visits and Complaints)
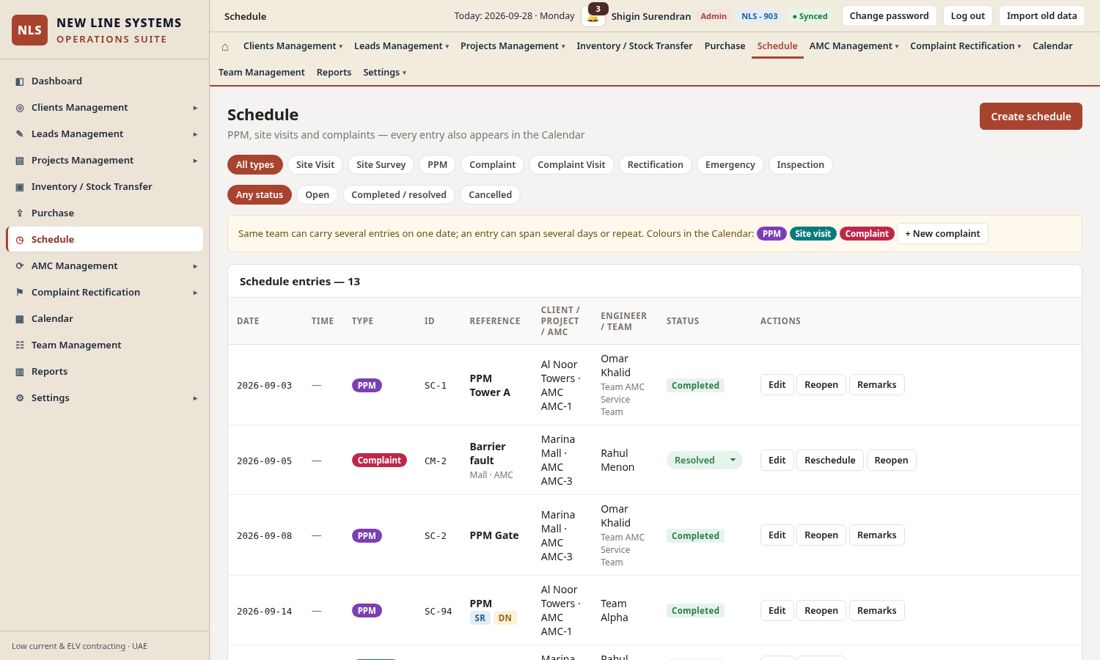
The Schedule menu is one list for planned maintenance visits (PPM), Site Visits and Complaint entries. Use the Type and Status filters at the top.
At the top of the Schedule page the tabs Schedule | Calendar open the same Calendar (with the Team filter) without leaving Schedule. The main Calendar menu item still works as before.
7.1 Create a schedule entry
- Press Create schedule (this button was called New schedule before version 15).
- Choose the Type (PPM, Site Visit and so on), the date and time, the team and engineer, and link the client, project or AMC contract.
- For repeating work choose the repeat (for example every 3 months) and Repeat until. Each repetition appears as its own visit in the list and the calendar.
- Save.
7.2 Work with an entry
| Button | What it does |
|---|---|
| Edit | Change any field (Admin and office roles) |
| Start | Marks the visit In Progress |
| Complete | Marks it Completed; for PPM you enter the completed date and remarks |
| Reschedule | New date; for PPM you can also add remarks |
| Reopen | Puts a completed or cancelled entry back to Pending |
| Cancel | Cancels the entry (a reason is recorded) |
| Remarks | Edit the remarks of a PPM visit without changing anything else |
Every action is recorded in the entry's history with your name and the time. For repeating entries you can complete, reschedule or cancel one visit or the whole series.
8. Leads, enquiries and quotations
8.1 Enquiries
- Leads Management > Create Enquiry (AMC enquiries: AMC Management > AMC Enquiry).
- Pick the client, the enquiry type (Project or AMC), a subject and tick the system(s) quoted: CCTV, Video Intercom, Structured Cabling, Access Control, Gate Barrier, SMATV, BGM. If you tick none, the systems are picked from the subject text.
- Enter the contact, site, source, the date received and (optionally) when the quote is due.
- Save. Manage Enquiries lists all enquiries with Edit, Acknowledge, Create quote, Convert and Lost.
Statuses: New, Contacted, Submit quote, Quote Submitted, Converted, Lost. (Before version 17 the stage was called Give quote / Quote Given; existing records were renamed automatically.) AMC enquiries use a shorter list and extra steps: see 11.11.
Acknowledge records the date and reference and requires the quotation PDF; Edit ack replaces that PDF until the enquiry is converted.
8.2 The quotation builder
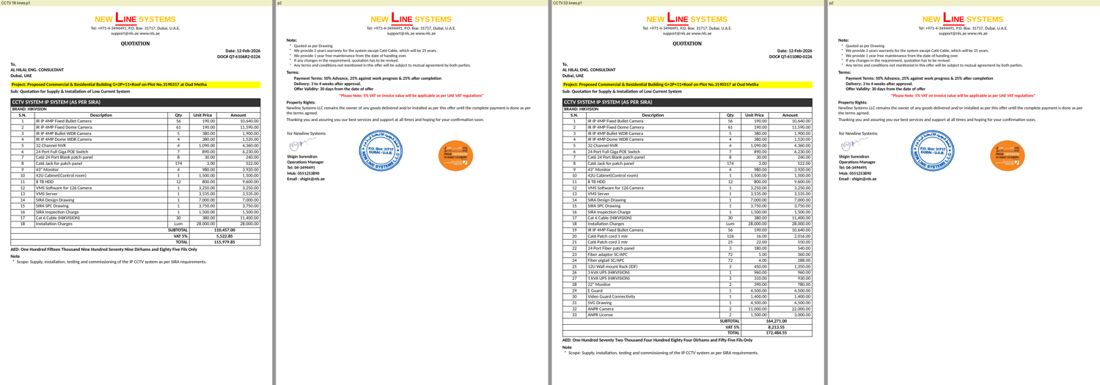
- In Manage Enquiries press Create quote.
- Choose the type: Quote with Breakdown (itemised: S.N., Description, Qty, Unit Price, Amount with SUBTOTAL, VAT 5% and TOTAL per system and a SUMMARY) or Lumpsum Price (one lump amount per system without the breakdown).
- The quote contains only the systems selected on the enquiry. Edit the rows: add, remove or move them; quantity can be a number or Lum; type the unit prices yourself.
- Totals and the amount in words (AED and fils) are calculated automatically. Notes, payment terms, delivery, validity and the signature block have default text you can edit.
- Save, then Print / Save as PDF, Download HTML or Excel from the print screen.
- A row with quantity 0 is not printed and the serial numbers renumber. A blank quantity is highlighted "Quantity missing" and printing is refused until you fill it (enter 0 to leave the row out).
- Number format: QT-<number>R<revision>-<MMYY>. Editing a Sent or Approved quote offers Save as a new revision (R0, R1, R2 with the same number); the old revision is kept as Superseded and excluded from totals.
- Quote statuses: Draft, Sent, Approved, Rejected. Master can view, print and export quotes but not create or edit them.
8.3 Approving a quote creates the project
Press Approve on a Project quote (or set its status to Approved). The system creates the Project / Work Order with a new job number, links the enquiry and quote, copies the value (excluding VAT) and sets the enquiry to Converted. Approving twice never creates a duplicate; it opens the existing project.
9. Projects and invoicing
9.1 Create and manage projects
Projects Management > Create Project / Work Order (or approve a quote). Manage Projects / Work Order (v19) uses the same list pattern as AMC Contracts: Action ☰ menu (opens right; includes Payment details), top-right Filter, and compact rows. First-page columns: Action | Job # | Project/Client | Team | Start→End | Status | Progress | Contract value (excl. VAT) | Received (excl. VAT) | Balance (excl. VAT) | % received (excl. VAT). Statuses: Not Started, In Progress, On Hold, Completed, Cancelled.
Version 15 adds column filters to the Projects list (same filter row as the AMC list) and an Edit button on every project.
9.2 Edit a project
- In Manage Projects open Action ☰ > Edit on the project row.
- Change the name, client, dates, value and other fields and Save. The change is recorded in the project history.
9.3 Delete a project (Admin) or ask for deletion (everyone else)
Only the Admin can delete. Other users press Request delete, give a reason and the Admin decides. See chapter 19.
9.4 Awaiting PO: acknowledging the client PO
A new project starts as Awaiting PO. Until the client PO is acknowledged, the status, site visits, material requests, payment terms, invoices and work order printing are locked. Press Acknowledge and enter the PO number, PO date and upload the PO PDF (PO amount is optional; you get a warning if it matches neither the value excluding nor including VAT). The badge then turns green: PO Acknowledged.
9.5 Payment terms
Open the project's PO & Terms page. Terms have two parts:
- Advance: a prepayment percentage that is recovered from progress claims (0% means no advance).
- Work value stages that must total 100%: Progressive milestones, Retention against handover and Retention against DLP period (default 12 months). The default terms are 30 / 90 / 5 / 5; press Apply default or set your own.
- Example: contract 100,000 with 30 / 90 / 5 / 5 bills 30,000 advance, then 90,000 progress claims less 30,000 recovery (60,000 net), then 10,000 retention. Total 100,000 excluding VAT (105,000 with VAT).
9.6 Invoice requests and invoices
- On the project row or on a stage in PO & Terms press Invoice request. The claim % is filled with the remaining % of the stage; you can change it but not exceed what remains.
- Accounts opens Projects Management > Project Invoicing. A pop-up tells you how many requests are waiting.
- Press Generate invoice, check the editable invoice (client, job, client PO, stage, %, amount, advance recovery, VAT) and generate it.
- Acknowledge the invoice by uploading the final invoice PDF and entering who acknowledged it. Reject needs a reason and the percentage returns to the stage.
- Record payment on the invoice (date, amount, method, reference). The status changes to Pending, Part Paid or Paid automatically.
9.7 Work progress and the Project Status report
Click the progress bar of a project (or Update progress on PO & Terms) to set Work completed % with a note; every update is logged. Projects Management > Project Status shows all projects with work %, contract value, invoiced, received, pending, balance to invoice and retention, with Print / Save as PDF. A red Over-billed badge appears when the invoiced % is above the work completed %.
9.8 Cancel and reopen
Cancel a project from its row (a reason and date are required). Cancelled projects are hidden from the default list; use the All / Active / Completed / Cancelled filter. Reopen puts back the previous status. A converted enquiry is set to Lost while its project is cancelled and goes back to Converted on reopen.
10. Inventory and Purchase
10.1 Inventory / Stock Transfer
Seven tabs:
| Tab | Use |
|---|---|
| Item master | Create items, units, minimum stock levels |
| Stock on hand | Quantity per store, reserved and available |
| Movements | GRN (goods received), issue to project, return, transfer between stores, adjustment |
| Low stock | Items below their minimum |
| Project material requests | Requests linked to a project (Pending, Approved, Issued, Rejected) |
| Reports | Stock summary and valuation, movement history per item, stock issued by project with cost; Print and CSV |
10.2 Purchase and Read PO from PDF / scan
- Purchase > + New PO to create a purchase order (Draft, Sent, Partially Received, Received, Cancelled).
- On the Goods received screen press Read PO from PDF / scan and choose a PDF, a photo or scan (JPG, PNG, WEBP), an Excel or CSV file, or paste the text.
- Check the review table carefully. Rows where quantity x price does not equal the amount are marked as doubtful. Scanned documents may be read inaccurately, so always verify before saving.
11. AMC Management: AMC contracts
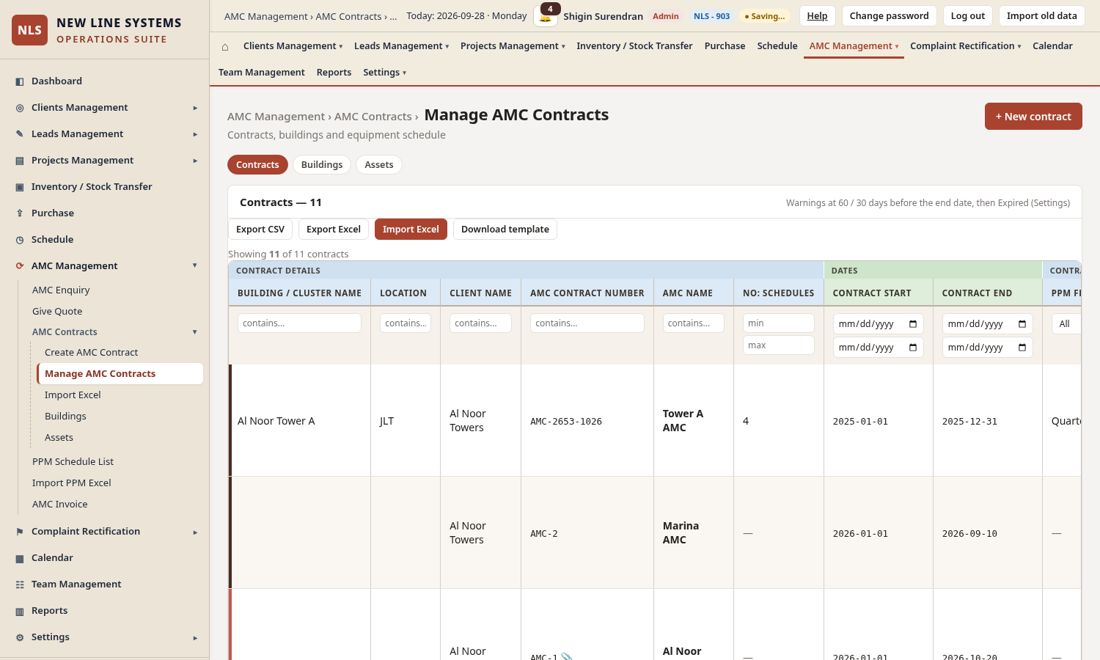
11.1 The columns
The Manage AMC Contracts first page shows Action, Contract No., Building (Location muted underneath), Client, Start, End, Last PPM, Next PPM, PPM Frequency, Status, Contract value (excl. VAT), Received (excl. VAT), Balance (excl. VAT) and % received. Other Excel fields stay on Edit / export / import:
| # | Column | Notes |
|---|---|---|
| 1 | Action | ☰ menu opens to the right: Client details, Task, PPM details, Checklist, PPM dates, Edit, Contract PDF, Renew, Delete request |
| 2 | Contract No. | Automatic (see 11.7) or typed; paperclip opens the contract PDF when attached |
| 3 | Building | Building / cluster name; Location appears muted underneath |
| 4 | Client | From Clients Management |
| 5 | Start | Contract start date |
| 6 | End | Contract end date |
| 7 | Last PPM | Last completed PPM date |
| 8 | Next PPM | Next PPM date |
| 9 | PPM Frequency | Weekly, Monthly, Bi-Monthly, Quarterly, Half-Yearly, Yearly |
| 10 | Status | Active, Renewal Due, Expired, Cancelled |
Rows use tighter spacing on the warm sand theme. Use the Action menu (☰) for Client details, Task, PPM details, Checklist, PPM dates, Edit, Contract PDF, Renew and Delete request. AMC Name, Systems, Type, Remarks, value and No: Schedules remain on the Edit form and in exports.
Other fields that exist on a contract: annual value, payment terms, status (Active, Renewal Due, Expired, Cancelled), buildings and assets. A contract whose end date has passed becomes Expired automatically.
11.2 Create or edit a contract
- AMC Management > AMC Contracts > Create AMC Contract (or press + New contract on Manage AMC Contracts).
- Fill in the building, location, client, contract name, number of schedules, start and end dates, PPM frequency and type.
- Tick the Systems Included (11.3). Enter last and next PPM dates and remarks if you have them.
- Leave the AMC Contract Number empty to get the next automatic number, or type your own. A number that is already used in the division is refused.
- Leave "PPM visit dates on the Calendar" on Yes to have the PPM visits created from the start and end date and the PPM Frequency (11.14).
- Save. To change a contract later open Action > Edit on its row.
11.3 Systems Included
Systems Included is a multiple selection with these 12 options: CCTV, Video Intercom, Audio Intercom, SMATV, Access Control, Gate Barrier, Sliding Door, Shutter, Home Automation, BGM System, Structured Cabling System and WiFi. You can also add your own tag in the form. Systems show as small coloured tags in the list, in the import preview and in the exports (separated by commas), and the column has a filter.
11.4 Remarks
Remarks is free text on the Edit form (Action > Edit). Each change is recorded in the contract history. Remarks can be filtered from the top-right Filter (field Remarks), imported from Excel, and are included in the template and in every export.
11.5 Filters and exports
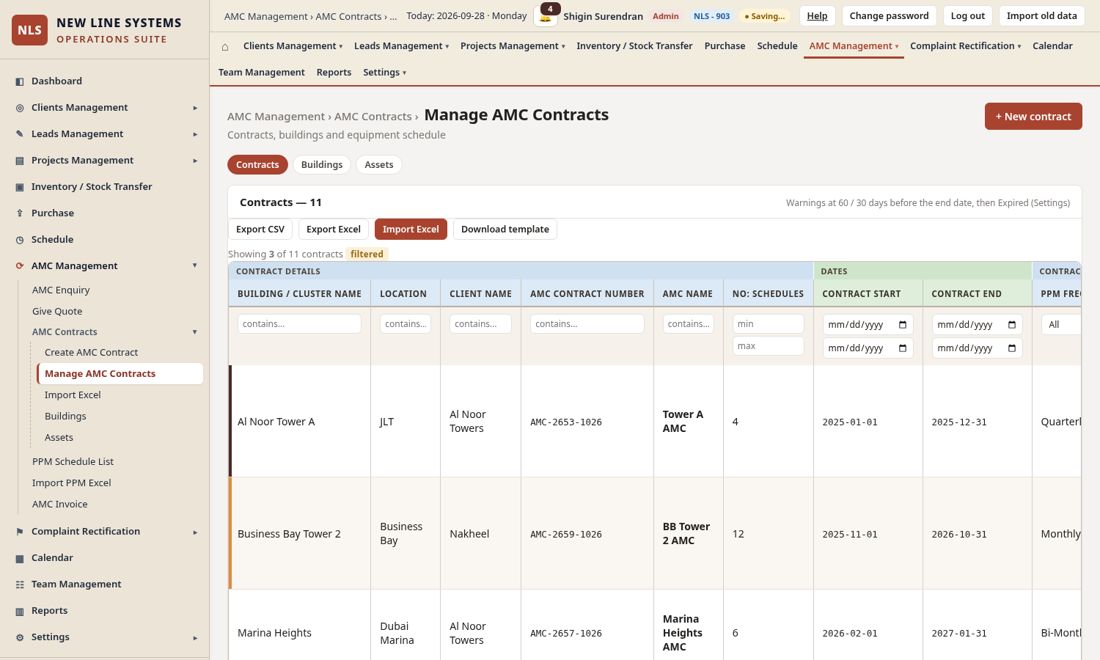
- Top-right Filter: choose a field (AMC Contract No., Client Name, Building Name, Location, PPM Frequency, Status, Systems, AMC Name, Type of Contract, Remarks), type a value and press Apply (or Enter). Matching is case-insensitive contains.
- Clear removes the filter and shows every contract again.
- Export CSV and Export Excel contain only the filtered rows (the file name says "filtered") and still include the full Excel column set.
- The Projects list still uses its own per-column filter row.
11.6 Contract PDF copy
Each contract can hold a PDF copy of the signed contract.
| Action | How | Who |
|---|---|---|
| Upload PDF | Action menu > Contract PDF, choose the PDF (max 25 MB) and Save | Admin and users with AMC Management access (not Master) |
| View | Click the paperclip icon next to the contract number; the PDF opens in a new tab | Everyone who can see the contract, including Master |
| Replace PDF | Action menu > Contract PDF and choose the new file; the old file is removed | Admin and AMC users |
| Remove PDF | Action menu > Remove PDF and confirm | Admin only |
Only PDF files are accepted for the contract copy. Deleting the contract also removes its PDF.
11.7 Automatic numbering
When you leave the contract number empty the system gives the next number in the division's series. The default format is AMC-2653-MMYY: prefix AMC-, the next number 2653 and the month and year of creation (1026 for October 2026).
The Admin controls the series per division in Settings > Company Settings > AMC contract numbering (chapter 17.2): the prefix, the next number and whether the -MMYY date suffix is added. Numbers are never reused, and the counter never goes back for the same prefix. A different prefix (for example MC-) starts its own series.
11.8 Import contracts from Excel
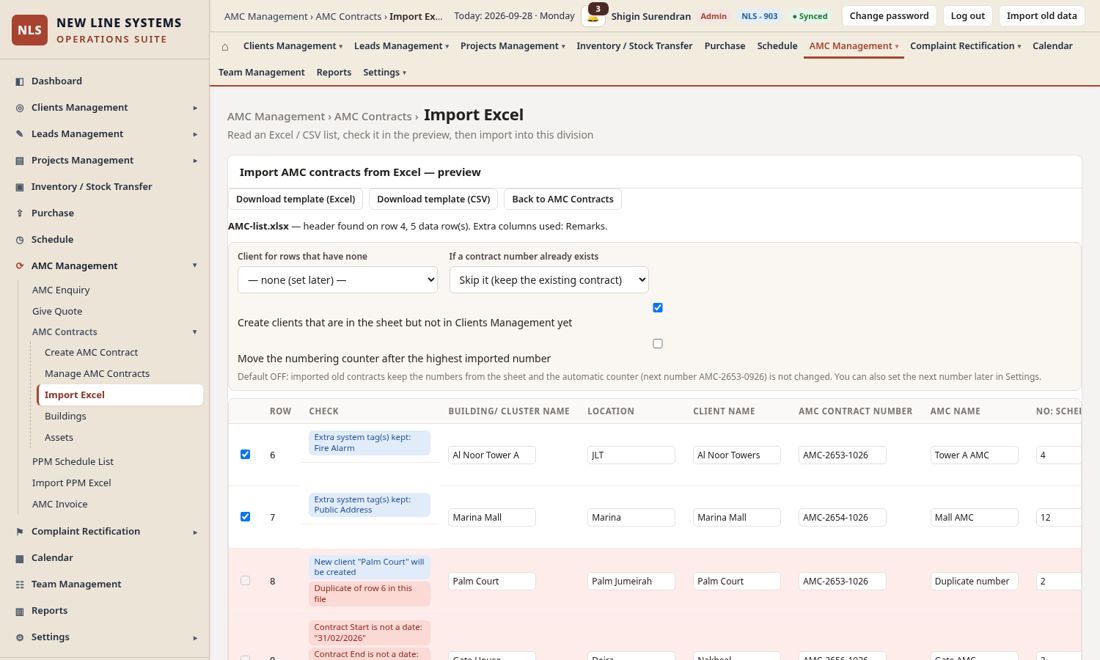
- AMC Management > AMC Contracts > Import Excel (or the Import Excel button on Manage AMC Contracts).
- Press Download template to get the sheet with the right columns, and fill it (or use your own AMC list; the headings are recognised).
- Choose the file (.xlsx, .xls or .csv). The first sheet is read; the heading row can be on any row.
- Check the preview. Each row has flags: green = will be imported, amber = warning (for example the client is not in Clients Management or a date was corrected), red = error (for example an unreadable date or a number that already appears earlier in the file). You can correct the cells in the preview, untick a row to leave it out, and choose what to do when a contract number already exists in the division: skip it or update it.
- Options: Client for rows that have none, Create clients that are in the sheet but not in Clients Management, and (Admin) Move the numbering counter so that imported numbers are not given out again.
- Press Import. A summary shows how many contracts were added, updated or skipped. Each imported contract is marked as imported and logged.
11.9 Renewals, warnings and e-mail reminders
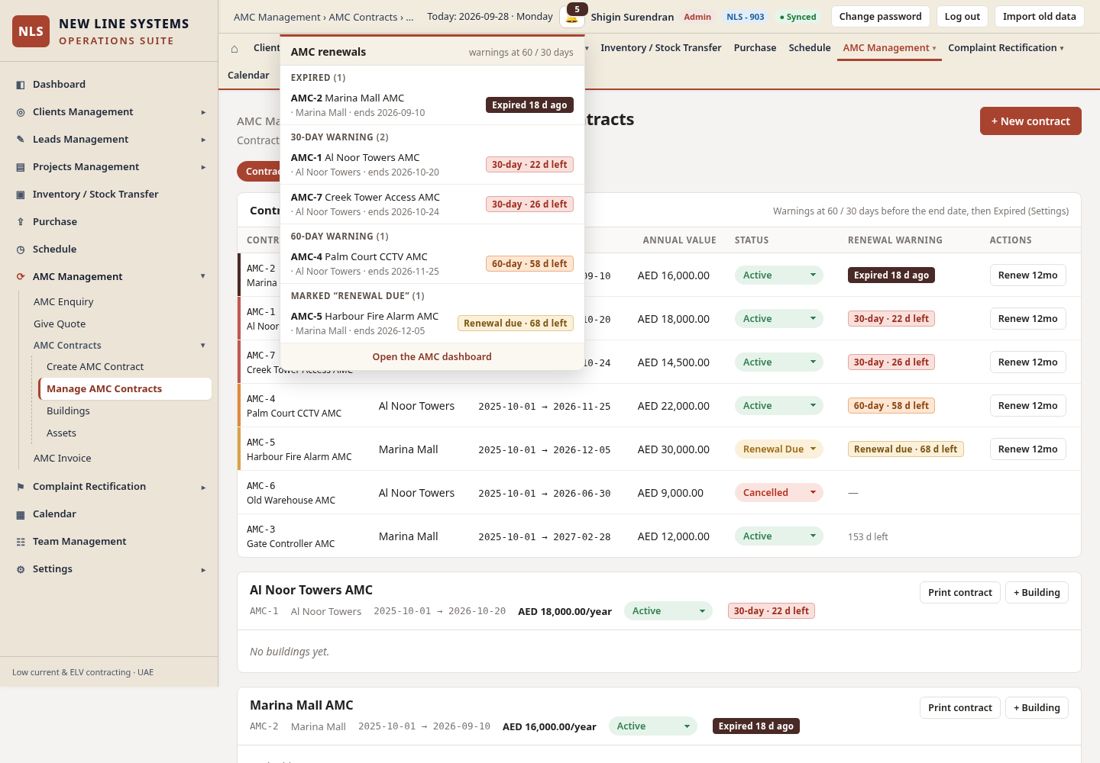
- Each contract carries a badge: Expired, the nearest warning (default 30 days), the earlier warning (default 60 days) or Renewal Due. The warning days are set in Company Settings.
- The bell in the top bar lists the contracts inside a warning window; clicking one opens the AMC page. The Dashboard AMC tab lists them grouped as 60-day, 30-day and Expired.
- Renew 12mo creates the next term starting the day after the old end date.
- E-mail reminders are sent automatically every morning at 09:00 Dubai time to the recipients set in Settings, once per contract and warning. Admin can press Send test email to check the setup.
11.10 Buildings and assets
Open the Buildings or Assets tab of AMC Contracts to see every building and piece of equipment across contracts. Inside a contract use + Building and add assets with their status (Working / Not Working).
11.11 AMC enquiry, quote and invoice
AMC enquiries follow three steps: Enquiry, Submit quote, Quote submitted. AMC Invoice lists contract invoices; use Record payment to log receipts.
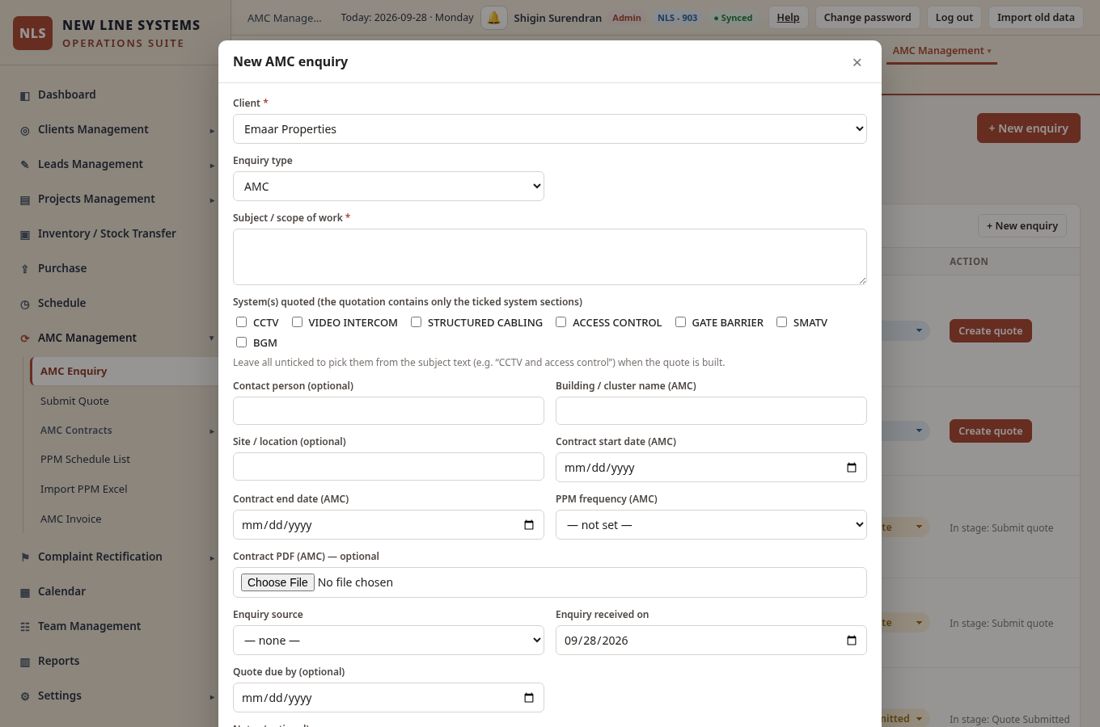
- AMC Management > AMC Enquiry > + New enquiry. Choose the client and the type AMC. Fill the subject, the systems, the contact and the building / cluster name and location.
- Enter the Contract start date and Contract end date, choose the PPM frequency (Weekly, Monthly, Bi-Monthly, Quarterly, Half-Yearly or Yearly) and, if you have it, attach the contract PDF. The frequency needs both dates. These values drive the automatic PPM dates when the contract is created (11.14).
- Save. The enquiry appears in the AMC enquiry list.
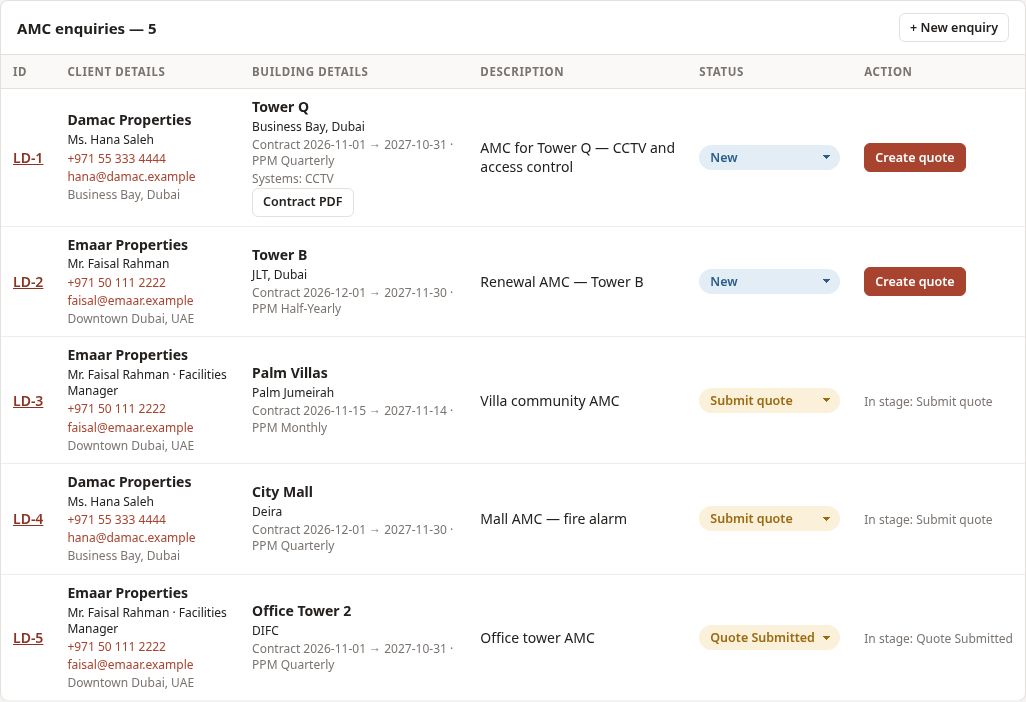
- The list shows the client details (name, contact person, phone, e-mail, address) and the building details (building, location, contract dates, PPM frequency, systems and the contract PDF).
- The Action column has only one button: Create quote. Pressing it moves the enquiry automatically to the Submit quote stage (status Submit quote). Nothing else opens.
- To change an enquiry click its ID: the edit form opens (the Admin can delete the enquiry there).
Submit quote
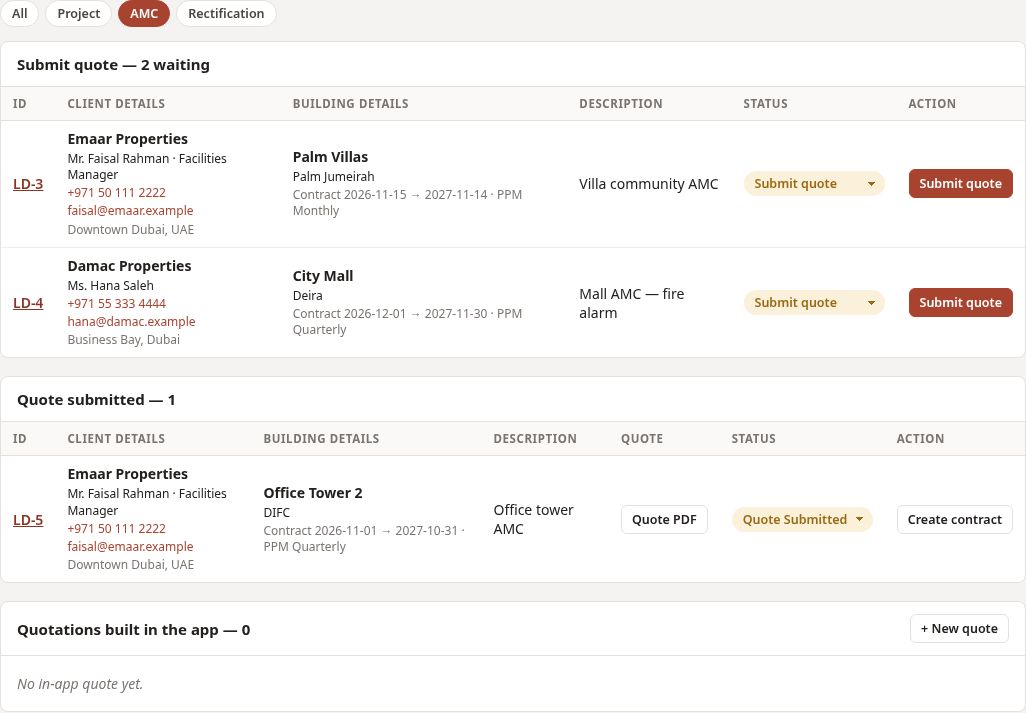
Open AMC Management > Submit Quote. The first list holds the enquiries at the Submit quote stage. Their Action column has the Submit quote button. It asks you to choose one of two options:
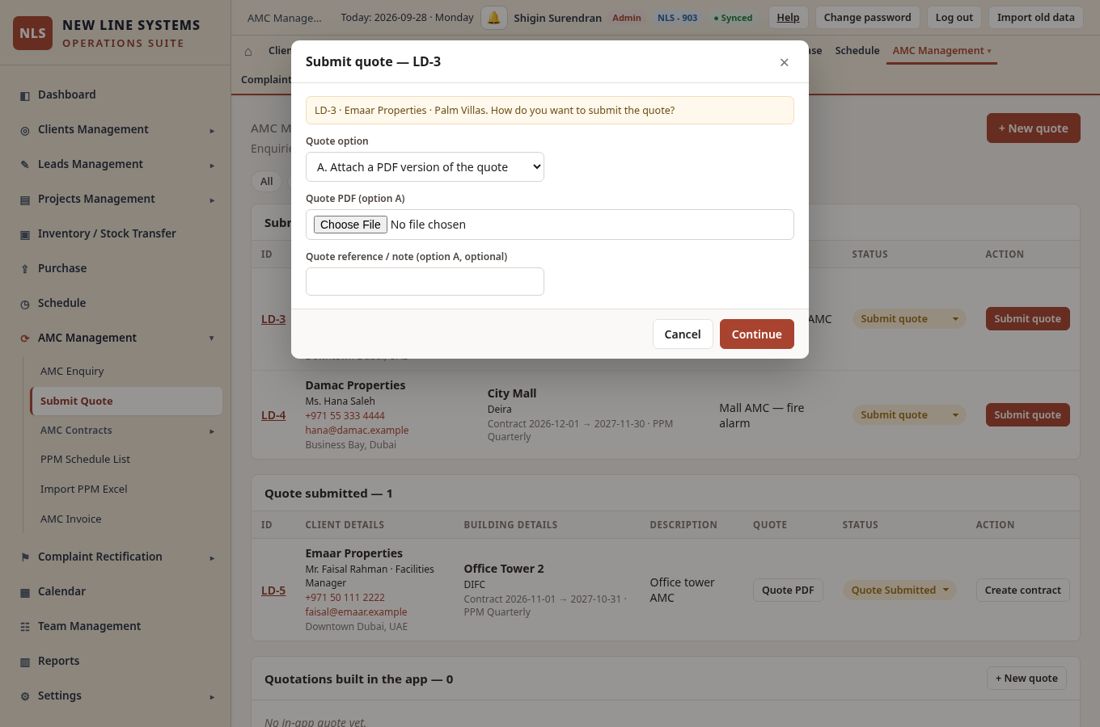
- A. Attach a PDF version of the quote: choose the PDF (and, if you like, a reference). The enquiry moves to Quote submitted and the PDF can be opened from the list.
- B. Use the in-app quotation format: the quotation builder opens for that enquiry. Select the systems, enter the details and prices, then Save quotation; the enquiry then moves to Quote submitted.
When the client accepts, press Create contract on the enquiry in the Quote submitted list. The contract form opens with the dates, PPM frequency and building of the enquiry already filled in; saving it creates the contract and its PPM visits and marks the enquiry Converted.
11.12 Master user
Master sees the AMC contracts of all divisions in one read-only list with a Division column. The paperclip icon still opens the PDF; no edit, upload or delete buttons are shown.
11.13 PPM checklist of the contract
Each contract can keep a checklist: the points the team must check at every PPM visit (for example Item CCTV > Equipment IP cameras > Item name Camera 1 - Main gate > IP Address 192.168.1.21 > Check item Lens clean and image clear). It is stored with the contract and every visit of that contract shows it (12.8).
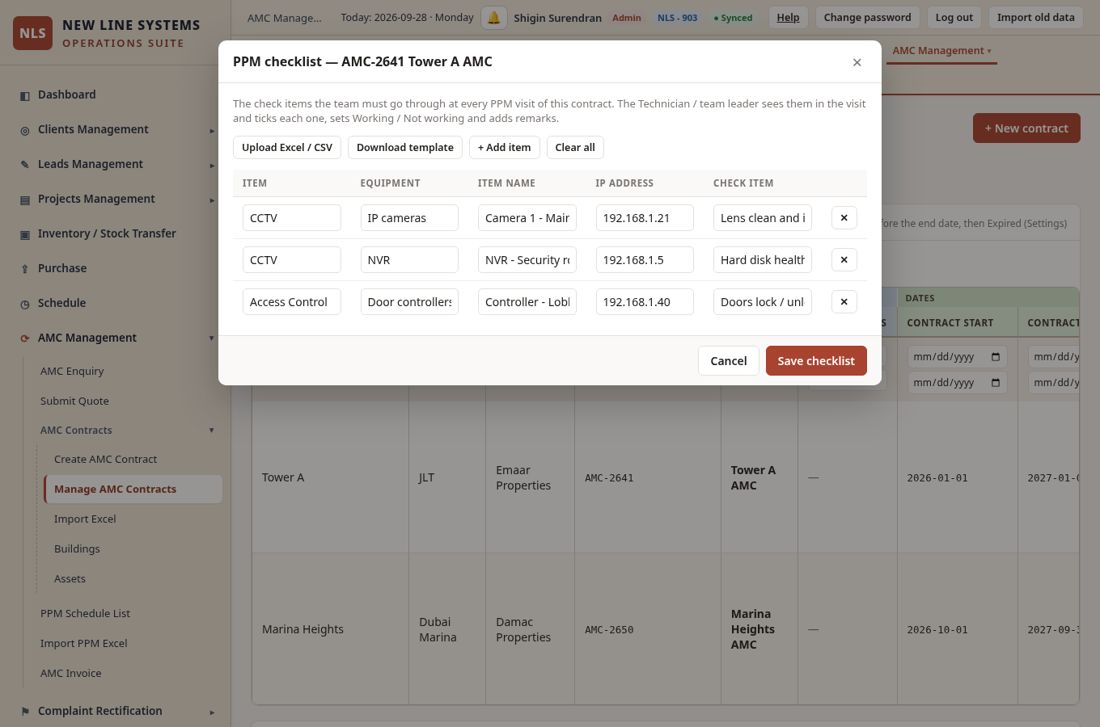
- AMC Management > AMC Contracts > Manage AMC Contracts. Open Action > Checklist on the contract (the number shows how many items it has).
- To use a list from Excel: press Download template, fill the columns Item, Equipment, Item name, IP Address and Check item (several rows can share the same Item / Equipment: leave the repeat cells empty), then press Upload Excel / CSV and choose the file. Older files whose first column is titled System are accepted too. The items are added to the list on the screen.
- To type by hand: press + Add item and fill Item, Equipment, Item name, IP Address and Check item. A row needs at least an Item name or a Check item. Press the cross to remove a row; Clear all empties the list.
- Check the list and press Save checklist.
The columns, in this order, are Item | Equipment | Item name | IP Address | Check item. The IP Address is read from a column titled IP Address (or IP) in the Excel / CSV file when there is one; otherwise type it. At the visit they are followed by the tick, Status (Working / Not working) and Remarks. If none of the items has a Check item, that column is left out of the visit and the printout.
11.14 Automatic PPM visit dates
When a contract has a start date, an end date and a PPM Frequency, the system creates the PPM visits for you and shows them on the Calendar and in the Schedule and PPM Schedule List.
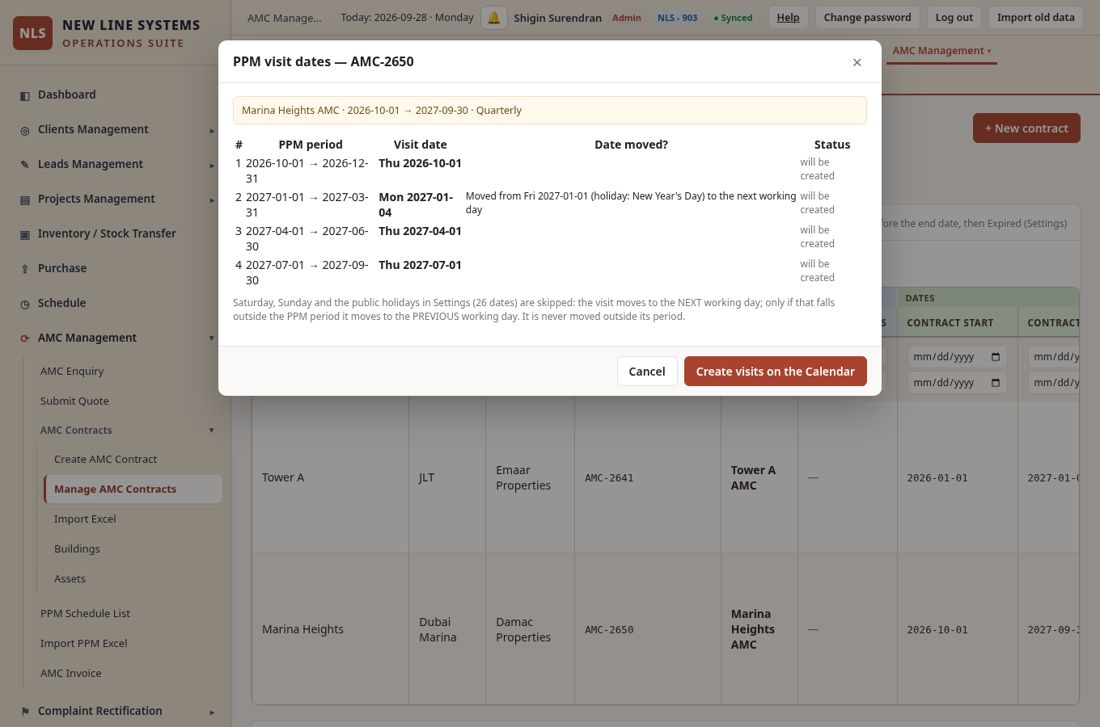
- Create the contract (11.2) with "PPM visit dates on the Calendar" = Yes, or press PPM dates on the contract row at any time to see the plan and create the visits.
- The contract is cut into PPM periods by the frequency: monthly = every month from the start date, quarterly = every 3 months, half-yearly = every 6 months, yearly = once. The first visit date of each period is the first day of the period (the first visit is on the contract start date).
- If that date is a Saturday, a Sunday or a UAE public holiday (Settings, 17.5) the visit moves to the NEXT working day. Only if that day falls outside the PPM period, it moves to the PREVIOUS working day of the period. A date is never moved outside its own period.
- Each visit is a separate Pending entry for the contract. Assign the team, engineer and time by editing the entry or when giving the PPM.
- A period that already has a PPM entry for the contract is not created twice. Periods that ended before today are skipped.
- After you change the start / end dates or the frequency, choose "Plan again" in the contract form (or press PPM dates). Untouched automatic visits in the future are re-planned; visits that were visited, completed, edited, rescheduled or have remarks / files are kept.
- Contracts imported from Excel and older contracts are not changed automatically: press PPM dates on the contract when you want the visits created.
- Frequencies other than the six in the list (or an empty frequency) create no visits.
12. PPM Schedule List
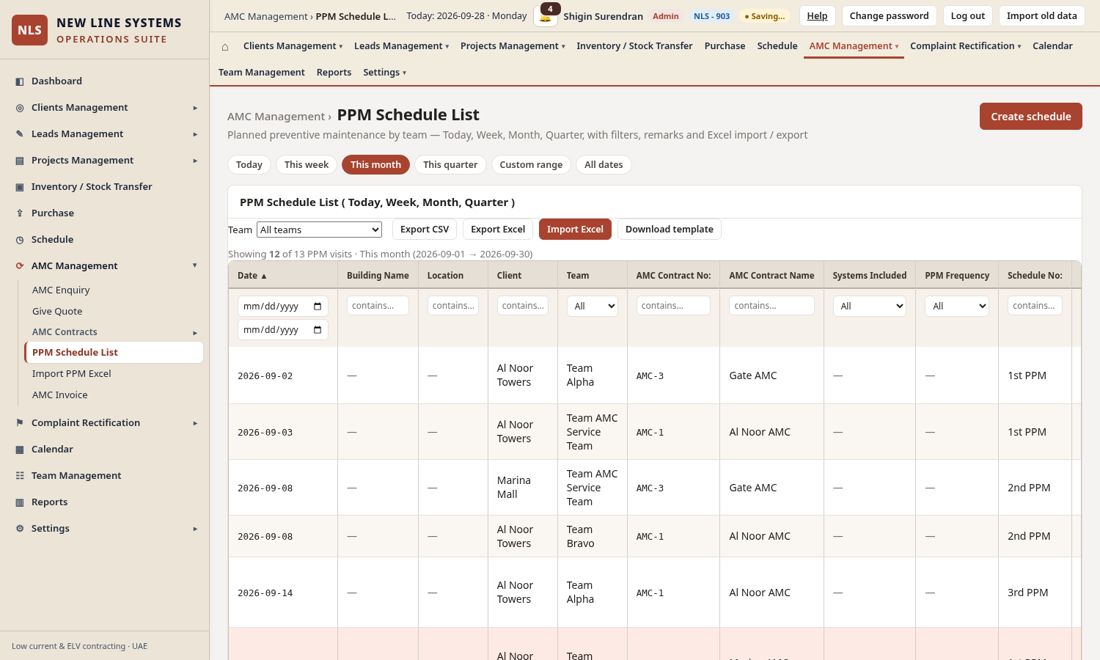
AMC Management > PPM Schedule List is the working list of preventive maintenance visits. It reads the PPM entries in Schedule and the AMC contracts and shows them in the columns of the PPM Schedule Excel sheet.
12.1 Quick views
Buttons at the top: Today, This week (Sunday to Saturday), This month (default), This quarter, Custom range (choose From and To) and All dates. The line under the buttons shows the dates being displayed and how many visits match.
12.2 Columns
| Column | Meaning |
|---|---|
| Date | Date of the visit (repeating visits are listed one by one) |
| Building Name, Location, Client | From the visit or from the AMC contract |
| Team | The team assigned |
| AMC Contract No: / AMC Contract Name | The contract the visit belongs to |
| Systems Included | Systems of the contract or of the visit |
| PPM Frequency | From the contract |
| Schedule No: | 1st PPM, 2nd PPM, 3rd PPM... counted per contract and building, or the number typed or imported |
| Last PPM Date | Completed date of the previous visit; for the first visit the contract's Last Completed PPM Date |
| Status, Overdue (days), Completed Date | Where the visit stands; overdue shows days late for open visits |
| Remarks | Notes on the visit (editable, pencil button) |
| Service Report / Delivery Note | Links to the attached files (chapter 13) |
The list has thin lines between all columns, alternating row shading and a darker header that stays in view while you scroll.
12.3 Filter, sort and export
- Filters under every column, a Team drop-down for Admin and office roles, and Clear filters.
- Click a column heading to sort, click again for the opposite order.
- Export CSV and Export Excel give the rows on screen with every column; with filters on the file name includes "filtered".
12.4 Open a visit (also from the Calendar)
Press Open on a row, or click the visit in the Calendar. The detail shows the building, location, contract, systems, frequency, schedule number, last PPM date, overdue days, completed date, remarks and the Documents section.
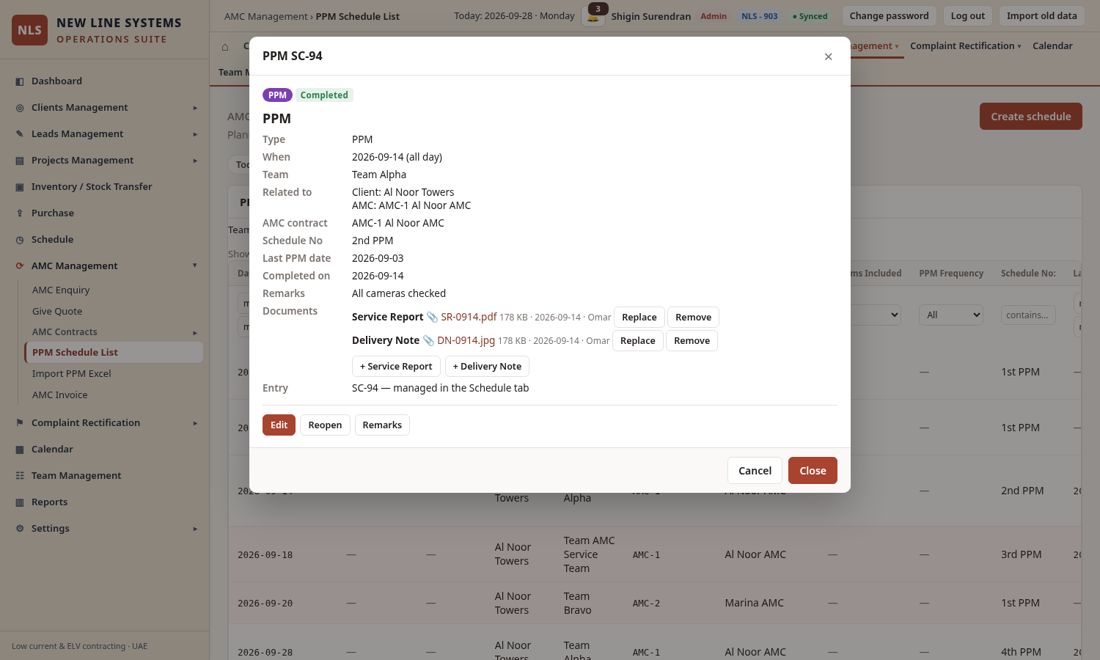
12.5 Each team sees its own schedule
- A Technician or Project Engineer sees only the PPM visits of the team(s) he or she belongs to or leads, in both the List and the Calendar. There is no team filter for them.
- This works only after the Admin links the person's login to a team member (16.3). A user who is not linked sees nothing and a message asking to contact the Admin.
- Admin and office roles see all teams. The Team filter on the list and the Team schedule drop-down in the Calendar show one team at a time.
- Admin sees a note on the list naming any technicians whose login is not yet linked.
12.6 Completing a visit
| Who | Can do |
|---|---|
| Admin | Edit the date and every field, enter remarks, reschedule, cancel, complete, upload / replace / remove documents |
| Office roles with Schedule access | Same as Admin except deleting |
| Team leader (a team member who is the team lead) | Complete + remarks, Remarks, and upload the Service Report / Delivery Note when completing |
| Technician / Project Engineer in the team | Complete + remarks and Remarks only; cannot change the date, team or other fields |
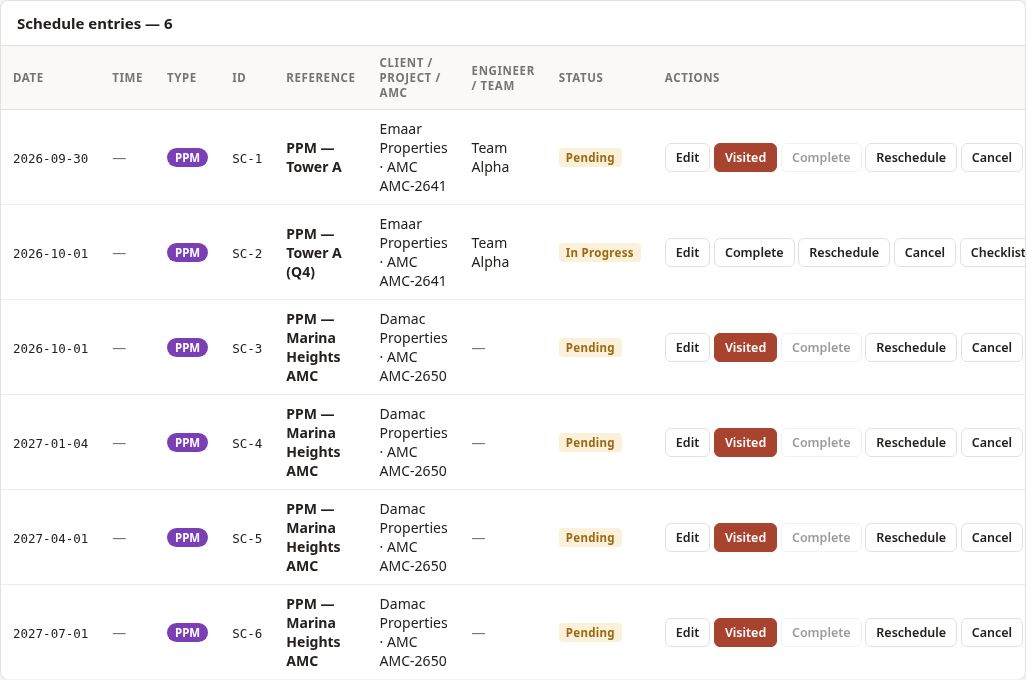
- When you arrive and carry out the visit press Visited (Schedule, PPM Schedule List or the visit detail in the Calendar). The date, time and your name are recorded and the status becomes In Progress.
- Now Complete (or Complete + remarks) is enabled. Press it, tick that the visit is completed, enter the completed date (it cannot be in the future) and the remarks.
- Choose the signed service report (PDF, JPG or PNG). It is required: the visit cannot be completed without it. Team leaders and Admin can also add a Delivery Note.
- Save. The visit shows as Completed with your name and the time in its history, and the next visit's Last PPM Date is updated.
12.7 Import the PPM schedule from Excel
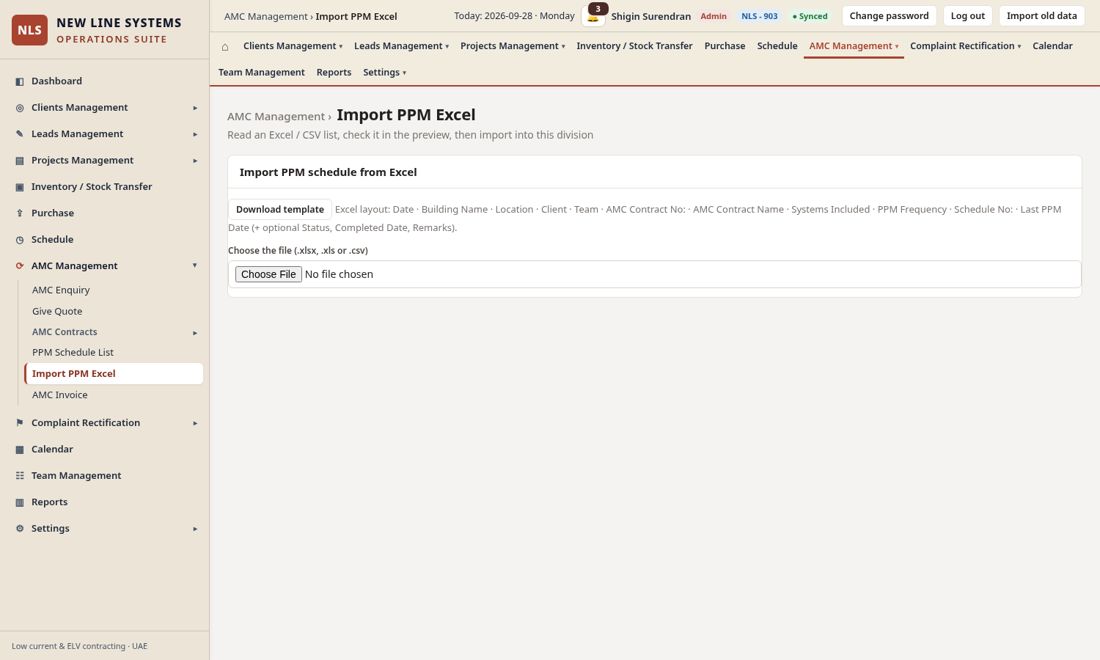
Use the PPM Schedule List Excel sheet with these headings: Date, Building Name, Location, Client, Team, AMC Contract No:, AMC Contract Name, Systems Included, PPM Frequency, Schedule No:, Last PPM Date. Optional columns: Status, Completed Date, Remarks.
- AMC Management > Import PPM Excel (or Import Excel on the PPM list). Admin and office roles only.
- Download template if you need the layout (it includes a Lists sheet).
- Choose the file. The heading row is found automatically; the "(Multiple selection)" hint row is ignored.
- Review the flags. Errors: the date is missing or not a date, the same visit appears twice in the file, no building. Skipped: the visit is already in the schedule. Warnings: the AMC contract, client or team is not found (the visit is imported with the text only, and it will not be visible to a team until a matching team is set), unknown status, extra systems.
- Correct cells in the preview if needed and press Import. Each imported visit is a normal schedule entry marked as imported.
12.8 The PPM checklist at the visit
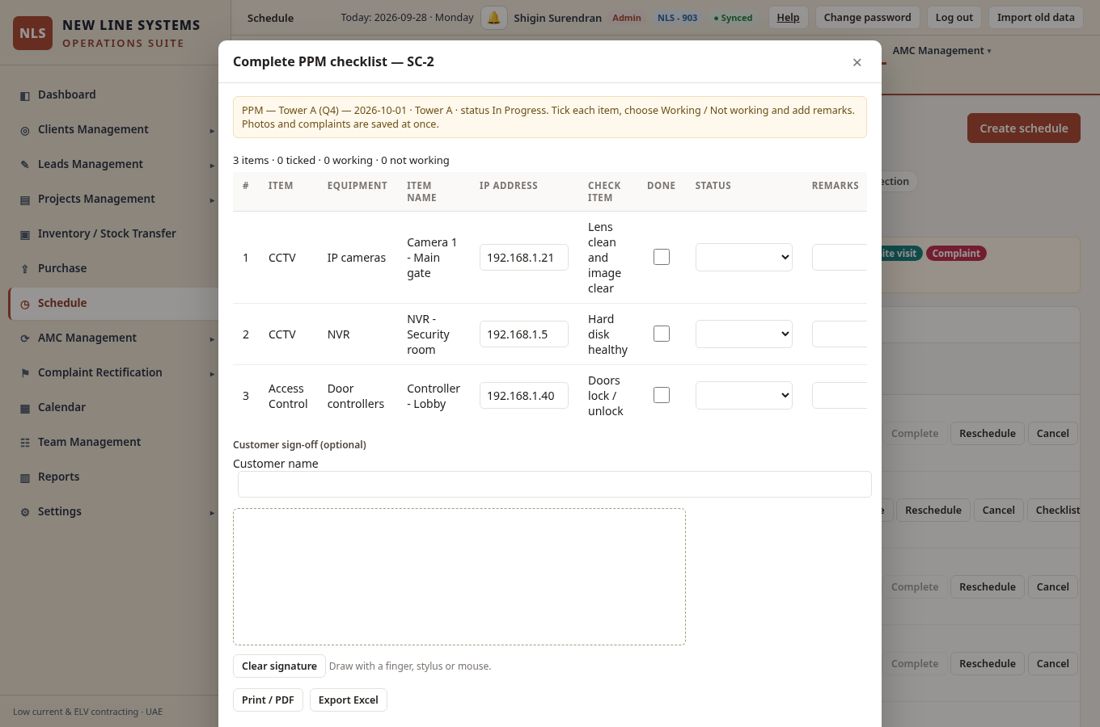
When the contract has a checklist, the visit detail shows it (items, ticked, working, not working) and the team fills it in. Each row shows Item | Equipment | Item name | IP Address | Check item, then the tick, the Status and the Remarks. The IP Address is filled from the contract and can be typed or corrected at the visit.
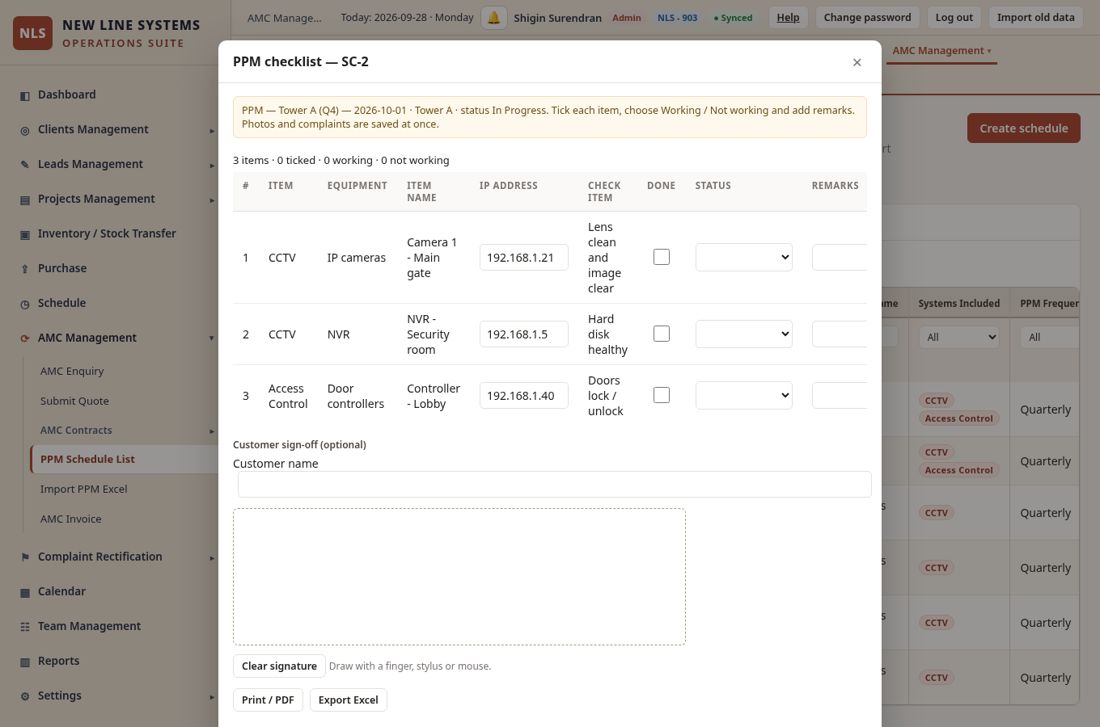
- AMC Management > PPM Schedule List (or the Calendar). Click the visit, then press Complete + remarks (or Fill checklist / Checklist).
- For every row tick the box, choose Working or Not working and write remarks if needed. Choosing a status ticks the item. A Not working row turns red.
- For a Not working item press + Photo and choose one or more JPG, PNG or WEBP photos (up to 10 per item). Photos are saved at once and can be removed with the cross.
- Press Create complaint on a Not working row to open a Complaint for it straight away. It is linked to the visit, the contract and the building. Each item makes only one complaint, so pressing it again or completing the visit later never creates a duplicate.
- At the end let the customer type their name and draw the signature in the box with a finger, stylus or mouse (Clear signature to start again). The signature is optional.
- Write the general remarks. To finish the visit choose Yes under Mark this PPM as Completed, check the date and press Save. If any item is still unticked the system asks you to confirm. By default every Not working item without a complaint gets one when you complete the visit; choose No to turn that off.
- The team leader and technicians of the visit's team fill the checklist; the Admin and office roles can open and correct it at any time, also after completion.
- The PPM Schedule List shows a red badge "n not working" next to the Status of any visit with a Not working item.
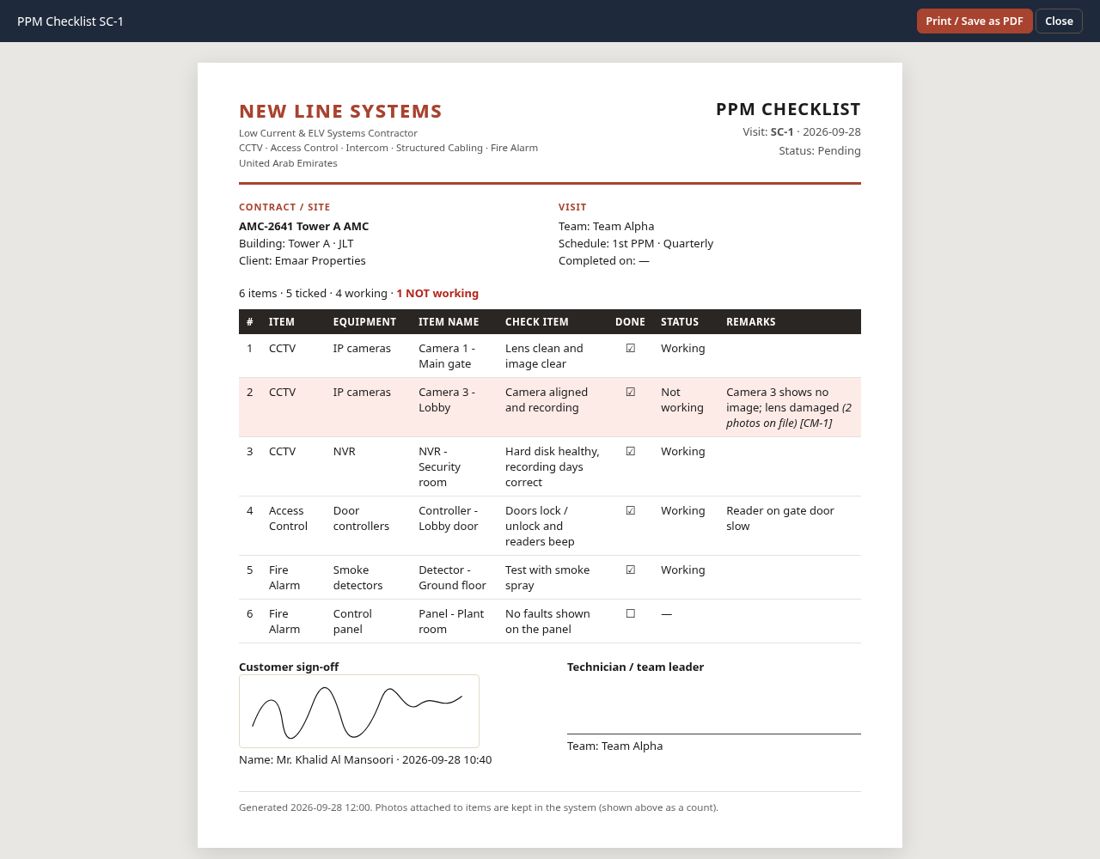
- Print / PDF and Export Excel (in the checklist or in the visit detail) give a one-visit checklist with the contract, building, team, every item with status and remarks, the number of photos, the customer name and the signature, and a blank line for the technician.
13. Service Reports and Delivery Notes
A PPM visit or a Complaint can carry any number of Service Report and Delivery Note files, as PDF or image (JPG, PNG, WEBP, 25 MB each).
13.1 Who can manage the files
- Admin and office roles with Schedule or Complaint access.
- The team leader of the visit's team.
- Other technicians can see and open the files but not add, replace or remove them.
- Master can only view.
13.2 Add, view, replace, remove
- Open the visit or complaint (from the PPM Schedule List, the Schedule list or the Calendar). The Documents row lists the files.
- Add: press + Service Report or + Delivery Note, choose one or several files and Save. Other file types are refused.
- View: click the file name; it opens in a new tab.
- Replace: press Replace beside the file and choose the new file; the old one is removed.
- Remove: press Remove and confirm. The removal is written to the history.
Files also appear as small links in the PPM Schedule List and the Schedule list, so you can see at a glance which visits have their paperwork. In a repeating PPM, files belong to the single visit you opened, not to the whole series.
14. Complaints
Complaint tickets are part of Schedule (type Complaint). The numbers stay CM-n.
- Schedule > Create schedule > Type Complaint (or Complaint Rectification > Schedule Visit).
- Enter the client, site, issue, whether it is under AMC (and which contract), the priority and the team / engineer.
- The status moves New > Scheduled > Site Visited > Resolved > Closed. Each change is logged.
- If the work needs a quote, use Complaint Rectification > Create Quote / Manage; then Schedule Rectification Works and Rectification Works Invoice.
- Attach the Service Report and Delivery Note to the complaint (chapter 13).
Complaints appear in the Calendar in their own colour and can be switched off under Activities.
15. Calendar
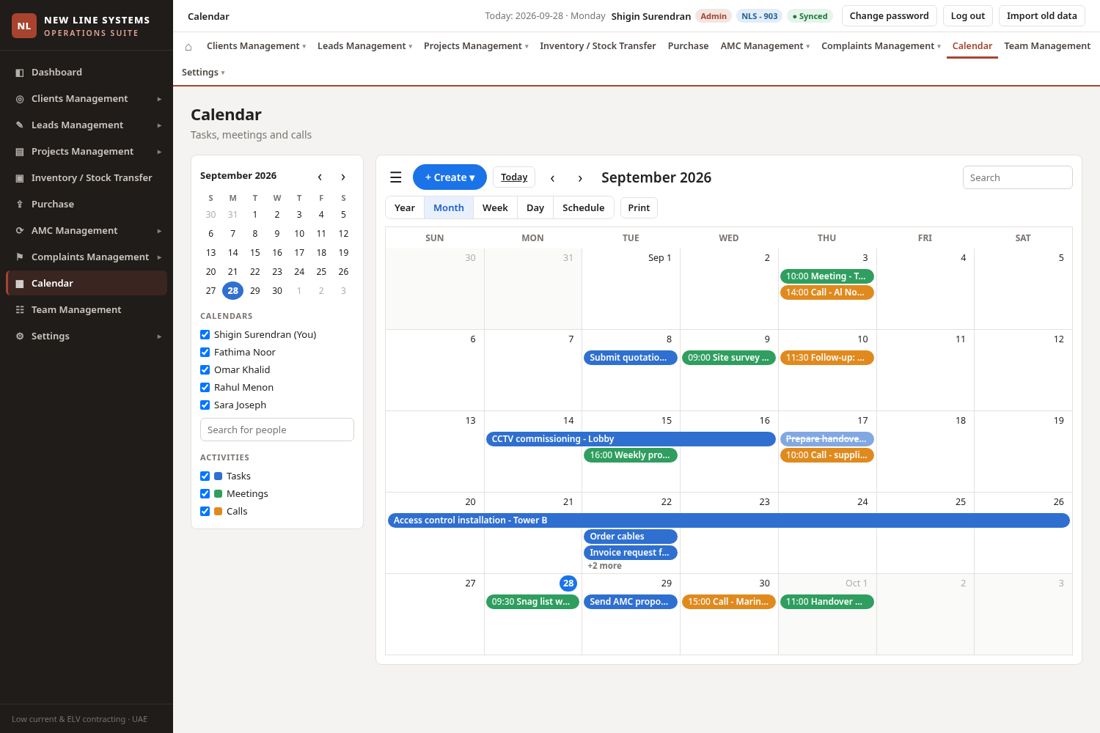
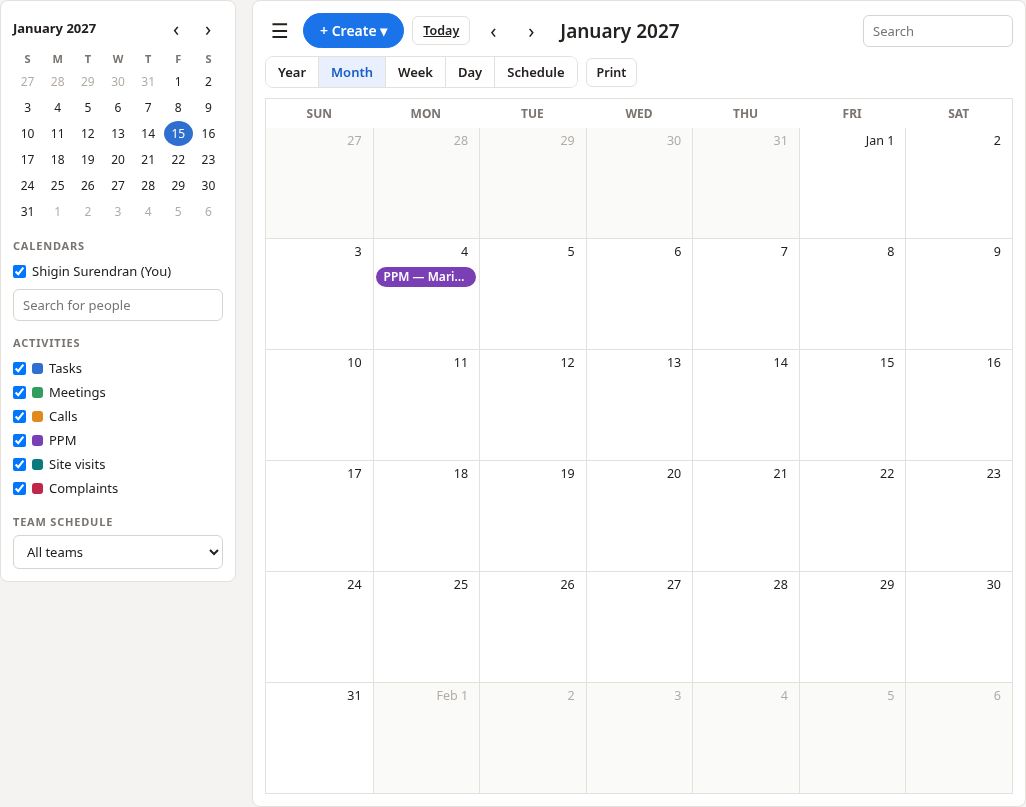
- Views: Year, Month, Week, Day and Schedule (agenda).
- From Schedule, use the Schedule | Calendar tabs at the top to open the same Calendar (with the Team filter) without leaving the Schedule page.
- Create tasks, meetings and calls: click a day or a time slot. Statuses: Open, In progress, Done, Cancelled.
- PPM visits (purple), Site Visits (teal) and Complaints (rose) are shown automatically from the Schedule; they are not copied. Tick or untick them under Activities.
- A PPM visit is shown only on its own scheduled date (one day), never across a whole period. Automatic PPM dates (11.14) appear here as soon as the contract is saved.
- Click a visit chip to open its details (the same detail as the PPM Schedule List) where you can complete it, add remarks and see its documents.
- Team and Date filters at the top of the Calendar (and on Schedule > Calendar): Team = All teams or one team; Date = All dates, Today, This week, This month, Pick a date, or a Custom range. They filter PPM visits, Site Visits, Complaints, tasks, meetings and calls. Both choices are remembered per division. Technicians and team leaders automatically see only their team's PPM visits.
- Under Calendars the signed-in user is labelled with the company name and (You), for example New Line Systems LLC (You). Other people keep their own names.
- Master sees all divisions read-only with a Division label.
16. Team Management
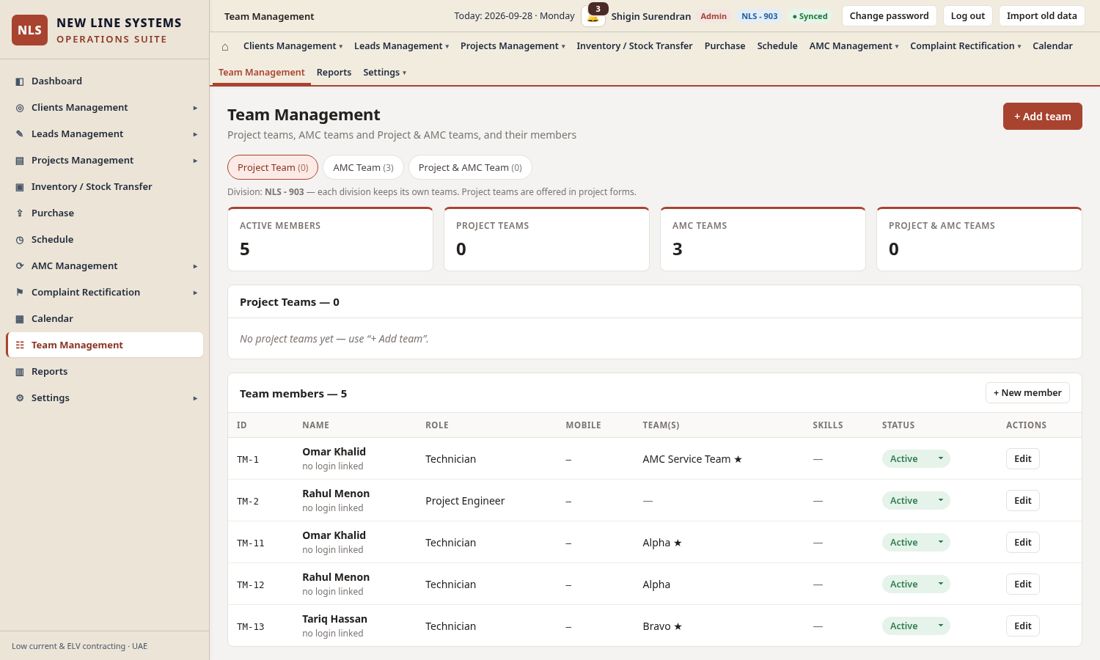
16.1 Teams
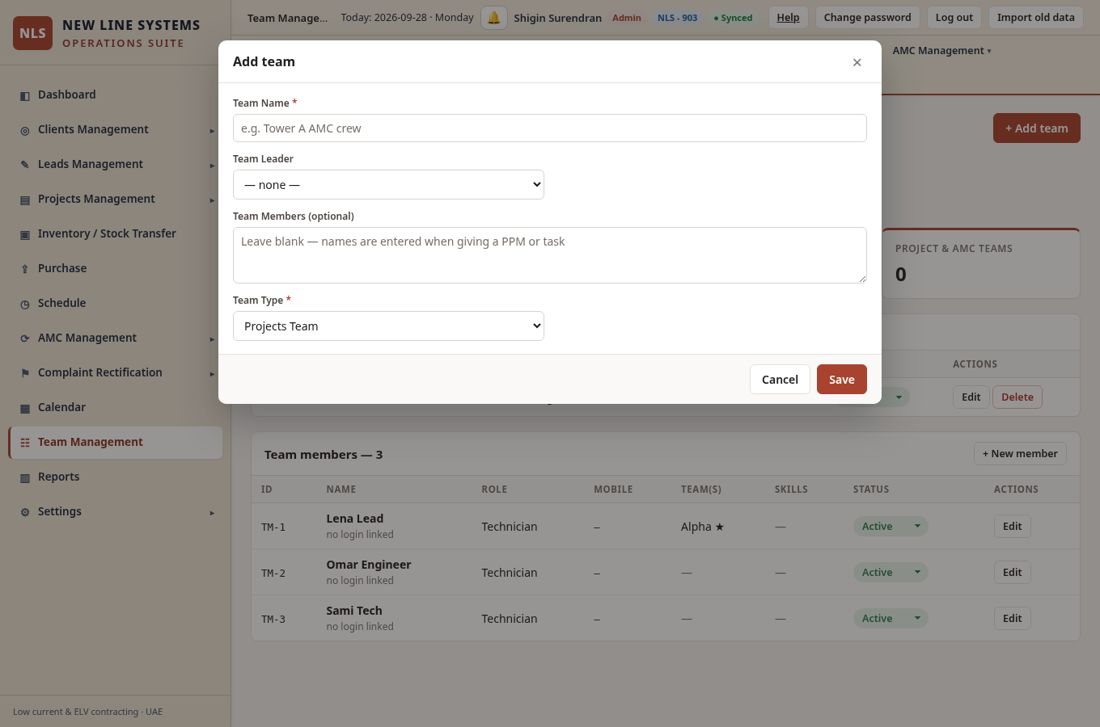
Three tabs: Project Team, AMC Team and Project & AMC Team. Use + Add team. The form has only four fields: Team Name, Team Leader (choose a team member), Team Members (optional — enter names here, comma or line separated) and Team Type (AMC Team, Projects Team or AMC & Projects). There is no separate Team members list on this page. The division is the one you are working in. Teams are offered in the forms that need them (project, AMC contract, schedule, complaint): an AMC Team in AMC and PPM forms, a Projects Team in project forms, an AMC & Projects team in both. Only the Admin can delete a team; members are kept.
16.2 Team members
Enter member names in Add team / Edit team (Team Members field). There is no separate + New member button on Team Management. Existing member records (from earlier versions) still drive the Team Leader list and the Users "Linked team member" picker.
16.3 Link a sign-in user to a team member
For a technician or team leader to see "their" team's PPM visits and complete them, their login must be linked to their team member record.
- Admin: Settings > Manage Users (or Create User), Edit the person.
- Choose the person in Linked team member.
- Save. Choose "None" to remove the link.
- The team lead is chosen in the team form (Team Leader). A linked member who is the team's lead becomes the team leader with the extra rights in chapters 12.6 and 13.
17. Settings and Users (Admin)
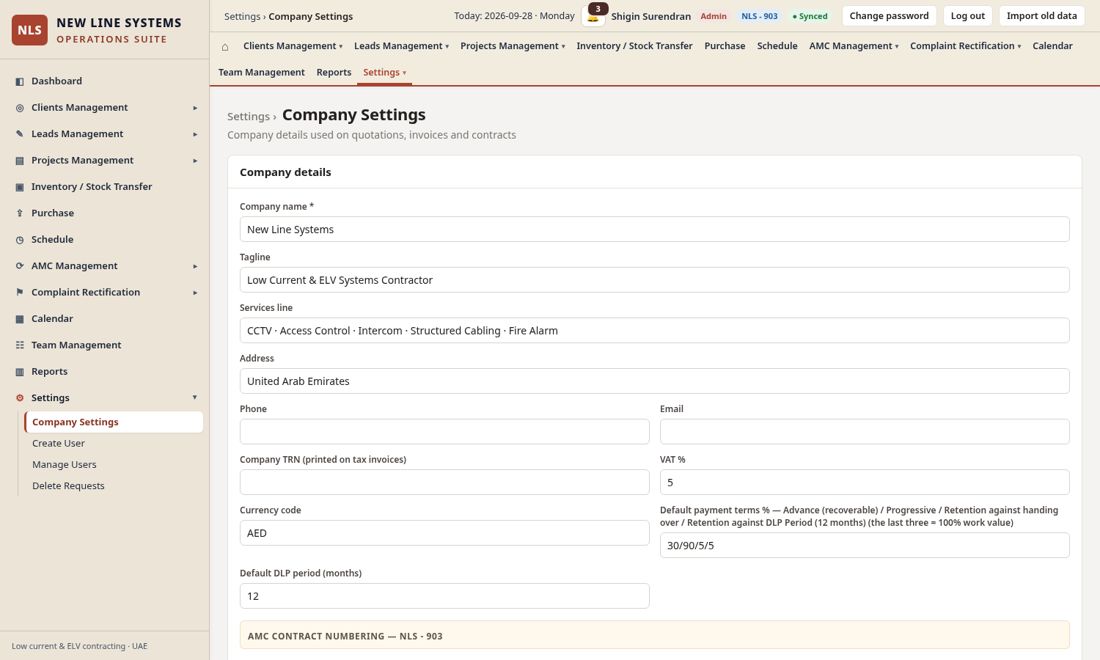
17.1 Company Settings
- Company name (default New Line Systems LLC): shown in the top bar and as the Calendar (You) label, and on quotes, invoices and AMC contracts. Tagline, services, address, phone, e-mail and TRN (15 digits); VAT % (5) and currency (AED).
- Default payment terms (Advance / Progressive / Retention at handover / Retention at DLP, default 30/90/5/5) and the DLP months.
- AMC renewal warning days (default 60,30), the reminder sender name and the e-mail recipients for the division, and the Send test email button.
- Each division has its own settings.
17.5 UAE public holidays (used for PPM dates)
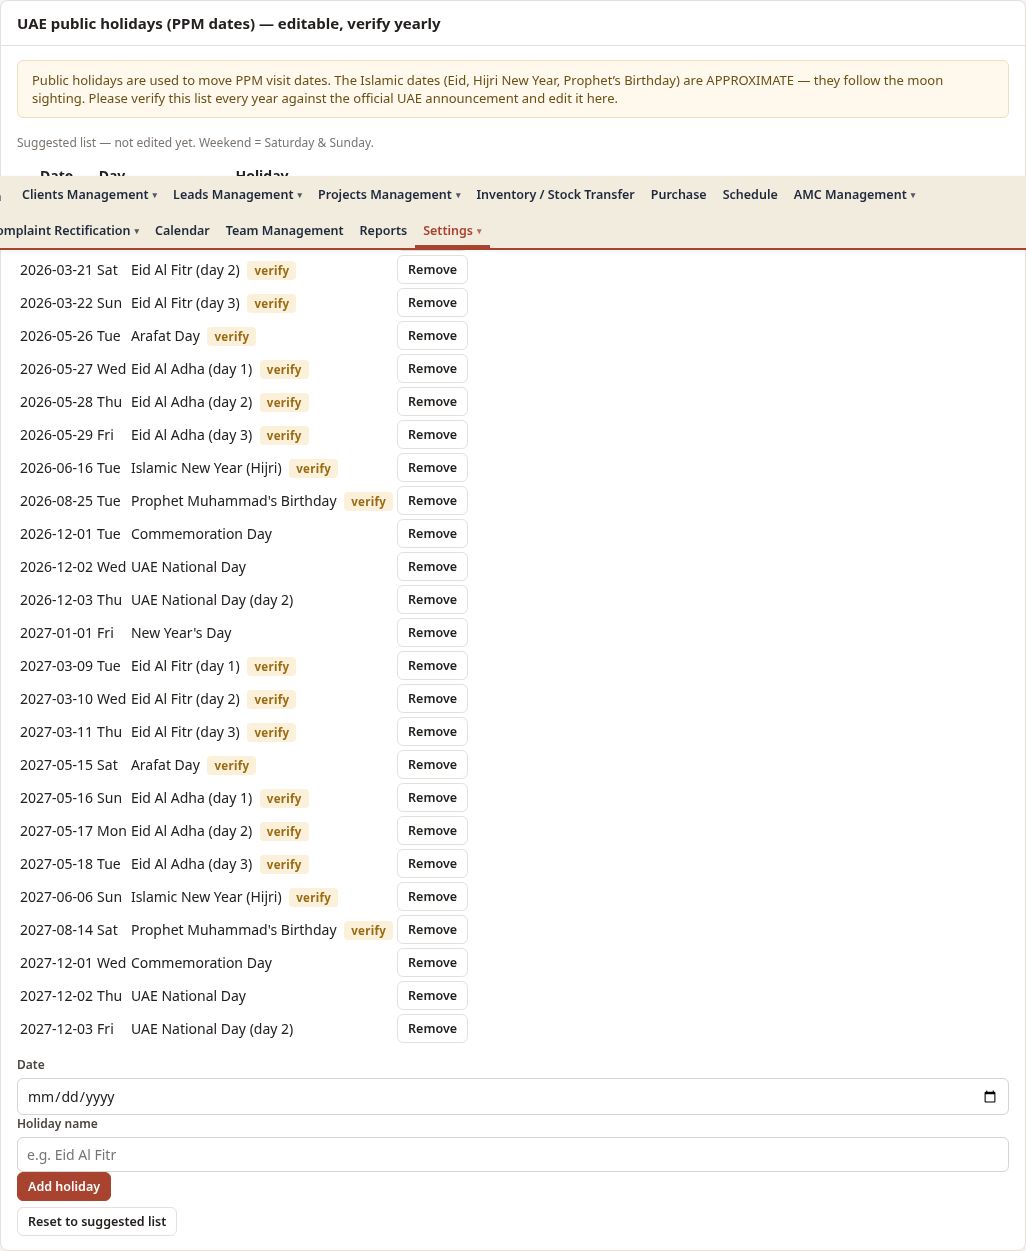
Below Company details the Admin finds the list of UAE public holidays. The list is pre-filled for 2026 and 2027 and is used by the automatic PPM dates (11.14): a visit is never left on a holiday.
- Add holiday: choose the date, type the name and press Add holiday. Remove deletes a line. Reset to suggested list brings back the pre-filled list.
- Saturday and Sunday are always treated as the weekend; they are not in the list.
- The yellow "verify" tag marks the Islamic holidays (Eid Al Fitr, Arafat Day, Eid Al Adha, Islamic New Year, Prophet Muhammad's Birthday). Their dates follow the moon sighting, so the pre-filled dates are only approximate.
17.2 AMC contract numbering
| Setting | Meaning |
|---|---|
| Prefix | Letters at the start of the number, for example AMC- or MC- |
| Next number | The next number to give (for example 2653). It acts as a floor: the system never gives a number lower than the highest already used for the same prefix. |
| Date suffix | Yes adds -MMYY (month and year of creation); No leaves it out |
A preview shows the next contract number. Changing the prefix starts a new series that can begin at any number.
17.3 Create and manage users
- Settings > Create User.
- Enter the full name, username (3-32 characters: letters, numbers, dot, underscore, dash), e-mail, mobile and role, and a password with confirmation. Master can choose the division; a division Admin creates users for the own division.
- Save. Manage Users lists the users; change Active / Inactive in the table, or Edit to change the details. Leave the password blank when editing to keep it.
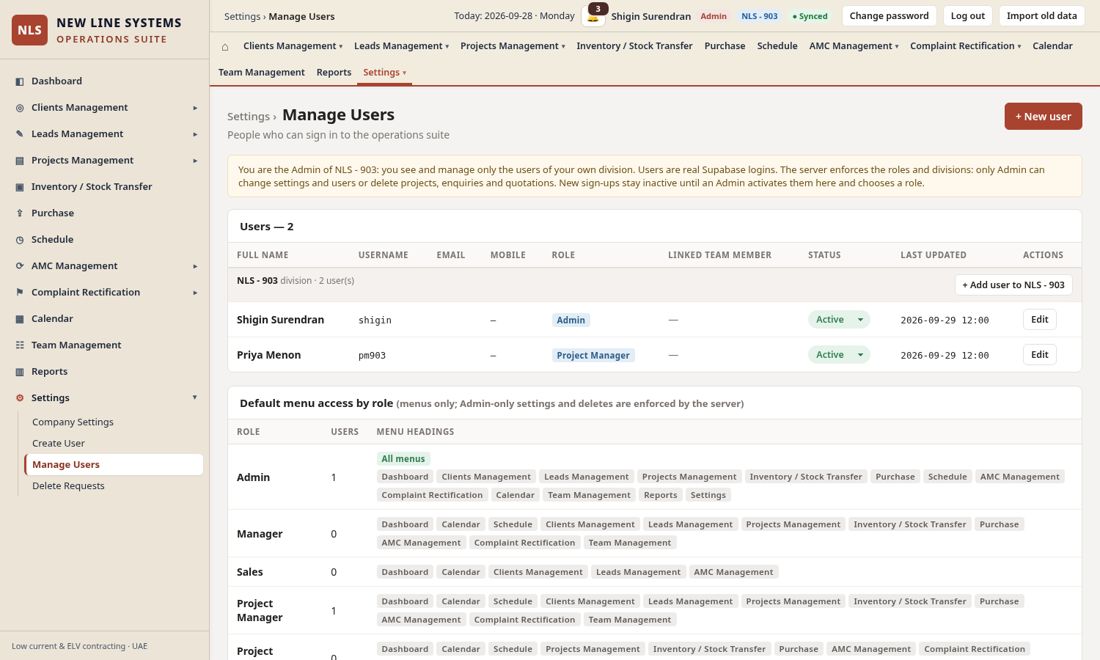
17.4 Import old data
The Import old data button (Admin) copies data from the earlier single-computer version or from a backup file into the shared database. It never overwrites existing records, so running it again is safe. It is also on the page Settings > Data: Backup, Export & Import, together with the backup (chapter 18).
18. Data: Backup, Export & Import (Admin)
Everything you enter is kept in the shared database. The free Supabase plan does not make automatic backups, so this page is your safety copy. It is for the Admin only: a division Admin handles the own division, the Master Admin handles all three divisions. Open it with Settings > Data: Backup, Export & Import.
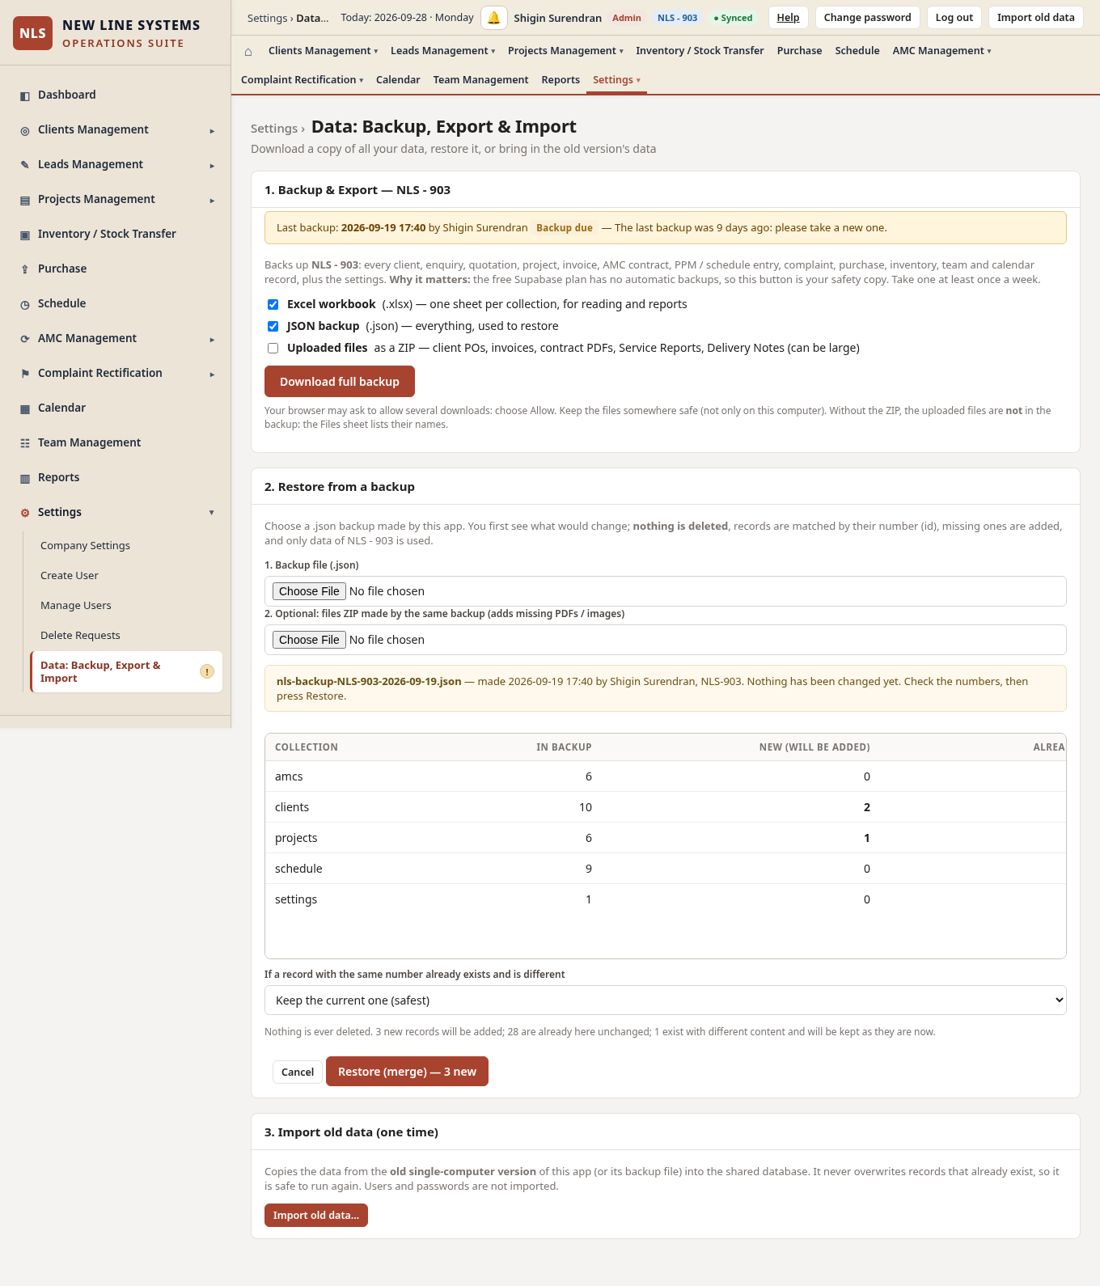
18.1 Download a full backup
- Settings > Data: Backup, Export & Import. Read the line "Last backup": it shows the date and who took it. A yellow "Backup due" means more than 7 days.
- Under 1. Backup & Export tick what you want: Excel workbook (one sheet per collection: clients, enquiries, quotations, projects, invoices, AMC contracts, schedule and PPM, complaints, purchase, inventory, team, calendar, AMC Checklists and PPM Checklists with the columns Item, Equipment, Item name, IP Address, Check item, settings, users and a Files sheet), JSON backup (everything, used to restore) and, if you also want the uploaded PDFs and photos, Uploaded files as a ZIP.
- Press Download full backup. Wait until the message "Backup downloaded" appears. Your browser may ask to allow several downloads: choose Allow.
- Keep the files in a safe place that is not only on this computer (for example the company cloud drive or a USB disk). The file names carry the division and the date.
18.2 Last backup date and reminder
- The date of the last backup is shown on this page and on Settings > Company Settings.
- When it is more than 7 days old (or no backup was ever taken) a small ! badge appears next to Data: Backup, Export & Import in the menu and the status line turns yellow. Taking a new backup clears it.
- A division Admin's date is shared by all Admins of the division. The Master Admin's date is kept in the browser used.
18.3 Restore from a backup
- Settings > Data: Backup, Export & Import > 2. Restore from a backup.
- Choose the .json file made by Download full backup. Optionally choose the files ZIP made at the same time.
- Read the preview. For every collection it shows how many records are in the backup, how many are new (will be added), how many are already here the same and how many exist but are different. Nothing has been changed yet.
- Choose what to do with records that exist but differ: Keep the current one (safest, the default) or Replace it with the backup version.
- Press Restore (merge). Confirm the question. The result line says how many records were added and replaced.
- Records are matched by their number (id). Missing records are added; nothing is ever deleted, so records created after the backup stay.
- A division Admin can only restore data of the own division; other divisions in the file are ignored. A file that is not an NLS backup is refused.
- With the ZIP, missing files are put back under their original names; files that already exist are never overwritten.
- Job, enquiry and quotation numbers continue after the highest restored number, and deleted numbers stay unused.
18.4 Import old data
The same page has 3. Import old data (one time). The button opens the existing import that copies the data of the earlier single-computer version, or its backup file, into the shared database. It never overwrites records that already exist, so it is safe to repeat. Users and passwords are not imported; create them with Create User. A division Admin imports into the own division; the Master Admin chooses the division inside that division. The Import old data button in the top bar still works as before.
19. Edit, delete and delete requests
Projects and AMC contracts can be edited by users who have access to the menu. Deleting is controlled so that nothing disappears by mistake.
19.1 Edit
Open Action ☰ > Edit on a row in Manage Projects or Manage AMC Contracts, change the fields and Save. The change is recorded in the history. Master cannot edit.
19.2 Admin deletes
- Press Delete on the row.
- Read the warning (for a project it names linked invoices and requests) and confirm.
Deleting an AMC contract also removes its PDF copy. Deleted project and quote numbers are never given out again.
19.3 Everyone else: Request delete
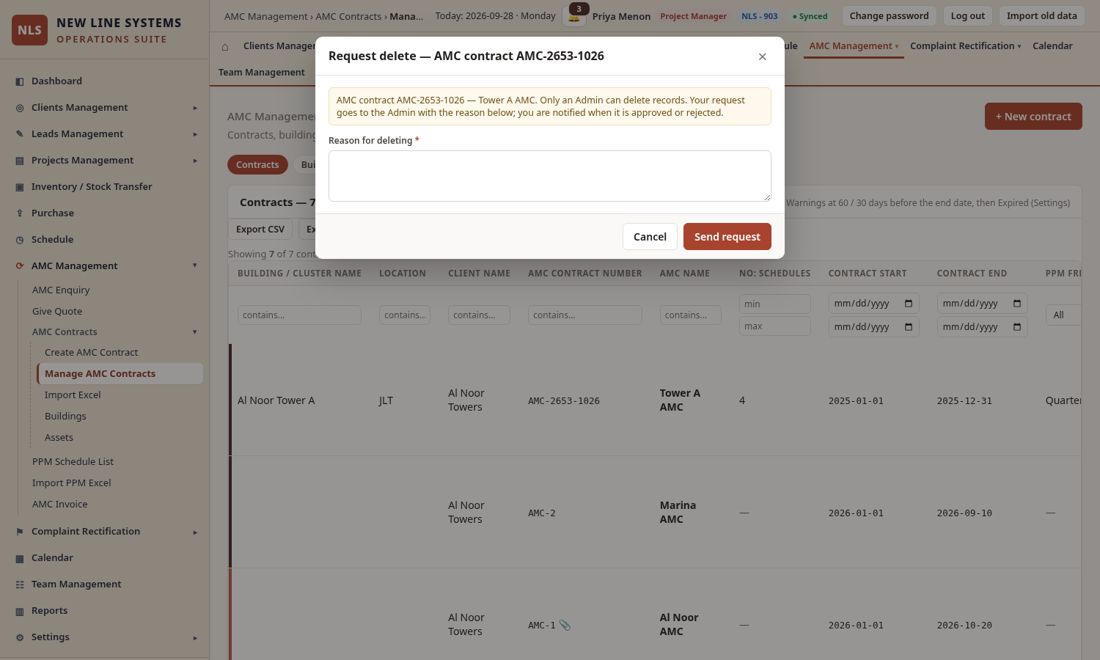
- Press Request delete on the project or contract row.
- Type the reason and press Send request. The row now shows "Delete requested" and the Admin is notified (menu badge and Dashboard tile).
- You can press Withdraw request to cancel the request while it is waiting.
19.4 Admin decides
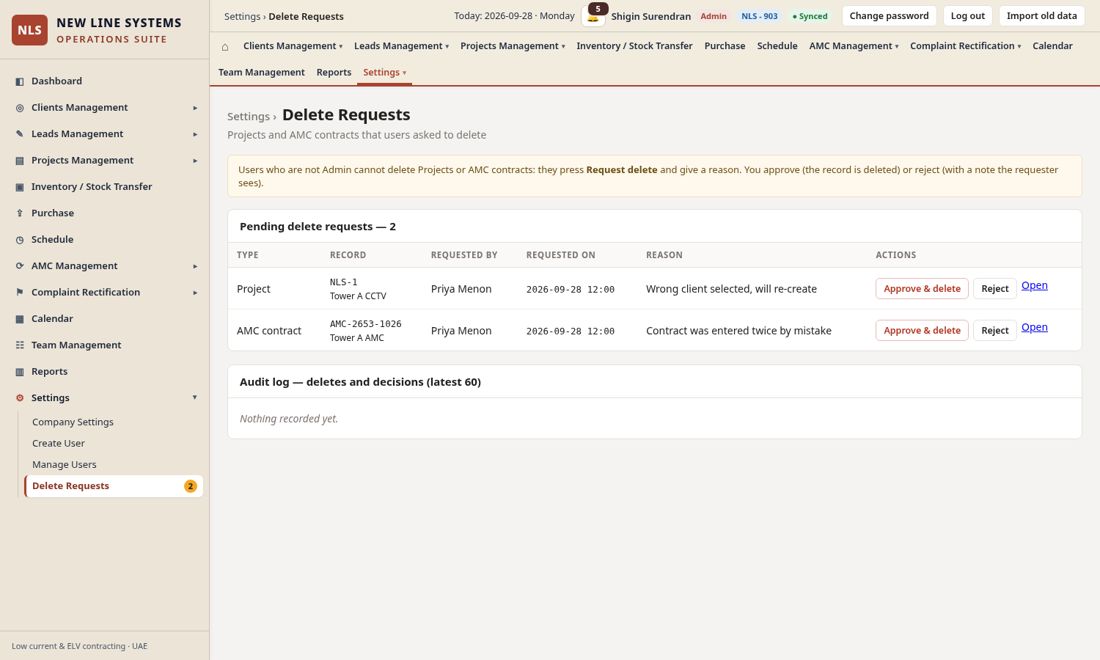
- Settings > Delete Requests. The badge on the menu shows how many are waiting.
- Each request shows the record, who asked, when and why.
- Approve deletes the record (with its files). Reject asks for a note explaining why.
- The requester sees the rejection note in the alert bell (with the Admin's name) and can dismiss it with OK; the Admin sees waiting requests in the bell too.
- Every request, approval and rejection is written to the audit log at the bottom of the Delete Requests page: action, record, requested by, reason, decided by, note and time.
- Master can see the page but cannot decide.
20. Reports
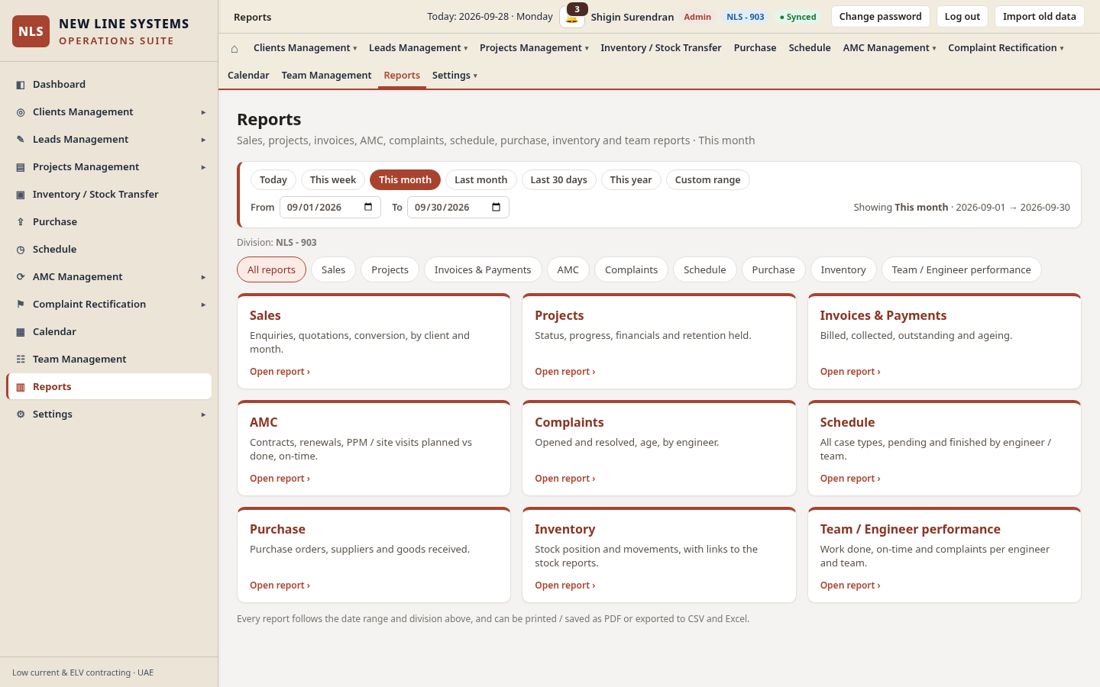
Reports shows one tile for each report you are allowed to open. Choose the date range with the same buttons as the Dashboard.
| Report | Shows |
|---|---|
| Sales | Enquiries, quotations, conversion %, by status / client / month / source |
| Projects | Status, progress, contract value, invoiced, received, pending, retention |
| Invoices & Payments | Billed, collected, outstanding, ageing buckets, by client / month, payments list (Admin, Manager, Accounts, Project Manager) |
| AMC | Contracts, renewal warnings, PPM and site visits planned vs done / pending / overdue |
| Complaints | Opened, resolved, open, age, average days to resolve, by priority and engineer / team |
| Schedule | All entries by status and by engineer / team |
| Purchase | POs by status and supplier, goods received |
| Inventory | Stock value, low stock, movements, material issued to projects |
| Team / Engineer | Entries, finished, on-time rate and complaints per engineer and team |
Every report has Print / PDF (company header, period, division), Export CSV and Export Excel. The screen shows the first 300 rows; the exports contain all rows. Master sees all divisions combined with a Division column.
21. Phone and tablet
- On a phone the menu is the three-line button; tables turn into cards (label: value) and forms open full screen.
- To install like an app: Chrome / Android: menu > Add to Home screen; Safari / iPhone: Share > Add to Home Screen.
- Technicians can complete their PPM visits and attach photos of the service report directly from the phone camera or gallery.
22. Tips, limits and troubleshooting
| Problem | What to do |
|---|---|
| I cannot sign in | Check the username and password. Ask the Admin whether you are Active. |
| A technician sees no PPM visits | The login is not linked to a team member (16.3), or the team has no visits in the chosen period (try All dates). |
| A team does not see an imported visit | The Team in the sheet did not match a team in Team Management. The visit was imported without a team; set the team by editing it. |
| The PDF or file does not upload | Check it is a PDF (or PDF / JPG / PNG / WEBP for Service Report and Delivery Note) and is under 25 MB. Image uploads need the storage setting described in the setup guide. |
| A file link says it cannot be opened | The secure link expired; click it again. |
| "Contract number already exists" | Choose another number or leave it empty for the next automatic number. |
| Import shows red rows | Fix the cells in the preview (for example the date), or untick the rows. Red rows are never imported. |
| I changed something and it vanished | Another person changed the same record. The screen shows the latest version; repeat your change. |
| The page looks old after an update | Press Ctrl + Shift + R (or close and re-open the app) once. |
| I cannot delete a project / contract | Only the Admin can delete. Use Request delete with a reason. |
| Master cannot edit | Master is read-only by design. Switch to a division to enter data. |
| The menu shows a ! beside Data: Backup | The last backup is more than 7 days old. Take a new one (chapter 18). |
| The backup does not contain my PDFs / photos | Tick Uploaded files as a ZIP before pressing Download full backup (18.1). |
| The visit has no checklist | The contract has no checklist yet: AMC Contracts > Checklist on the contract (11.13). Visits already filled in keep their own copy. |
| Complete is greyed out on a PPM visit | Press Visited first (12.6). Complete needs the visit to be recorded as visited and the signed service report (PDF, JPG or PNG). |
| A PPM date is not on the day I expected | The generated date was a Saturday, Sunday or public holiday and moved to the next working day (or the previous one when the next was outside the PPM period). See 11.14 and the holiday list in Settings (17.5). |
| The PPM dates were not created for a contract | The contract needs a start date, an end date and a PPM Frequency, and "PPM visit dates on the Calendar" must be Yes. Older and imported contracts: press PPM dates on the contract row. |
| I cannot find Give Quote | It was renamed Submit Quote (11.11). |
| I cannot draw the signature | Use the signature box in the checklist form with a finger, stylus or mouse; on a PC hold the left mouse button. Sign again clears it. |
Good habits
- Fill the contract number, client and building before importing, to avoid warnings.
- Keep the sheet in the same column order as the template.
- Complete visits the same day with remarks and the Service Report, so the Last PPM Date of the next visit is right.
- Give each technician their own login and link it to their team member.
- Wait for the Synced light before you close the browser or switch off the phone.
23. Glossary
| Term | Meaning |
|---|---|
| AMC | Annual Maintenance Contract |
| PPM | Planned Preventive Maintenance visit |
| Site Visit | A visit for survey, inspection or other work that is not a PPM |
| Complaint (CM-n) | A client's fault report handled in Schedule |
| Service Report | Document signed after a visit, describing the work done |
| Delivery Note | Document that records material delivered |
| Team leader | A team member who is the lead of a team and is linked to a login |
| Master | Head-office user who sees the combined totals of all divisions, read-only |
| Division | NLS - 902, 903 or 904: separate data sets |
| Flag | A check result in an import preview: green, amber (warning) or red (error) |
| DLP | Defects Liability Period |
| PO | Purchase Order from the client (Client PO) or to a supplier |
| Retention | Part of the contract value held back until handover or the end of the DLP |
| GRN | Goods Received Note |
| Audit log | The Admin's record of delete requests and decisions |
| Backup | A copy of all the data (Excel and JSON, optionally the uploaded files) kept outside the system |
| Restore | Putting the data of a backup back by merging by number; nothing is deleted |
| Visited | The button that records the date, time and person of a PPM site visit; it must be pressed before Complete |
| Submit quote | The AMC enquiry stage after Create quote, where the quote is attached as a PDF or built in the app (before version 17: Give quote) |
| Working day | Monday to Friday that is not a UAE public holiday in Settings |
| PPM checklist | The list of points checked at every PPM visit of a contract, with Working / Not working and remarks |